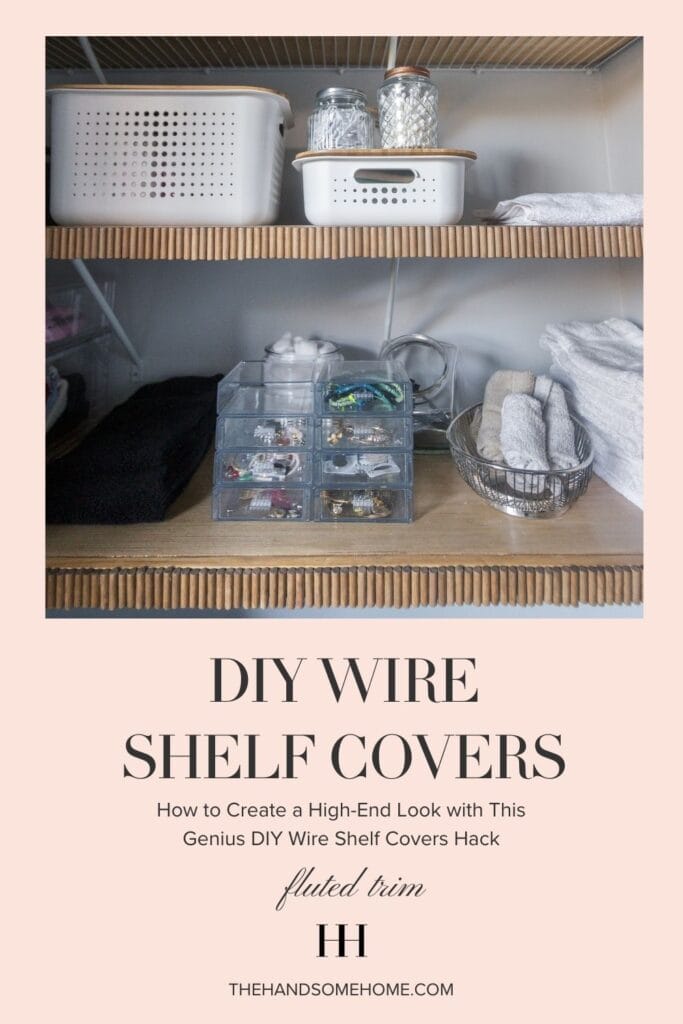
How to Create a High-End Look with This Genius DIY Wire Shelf Covers Hack
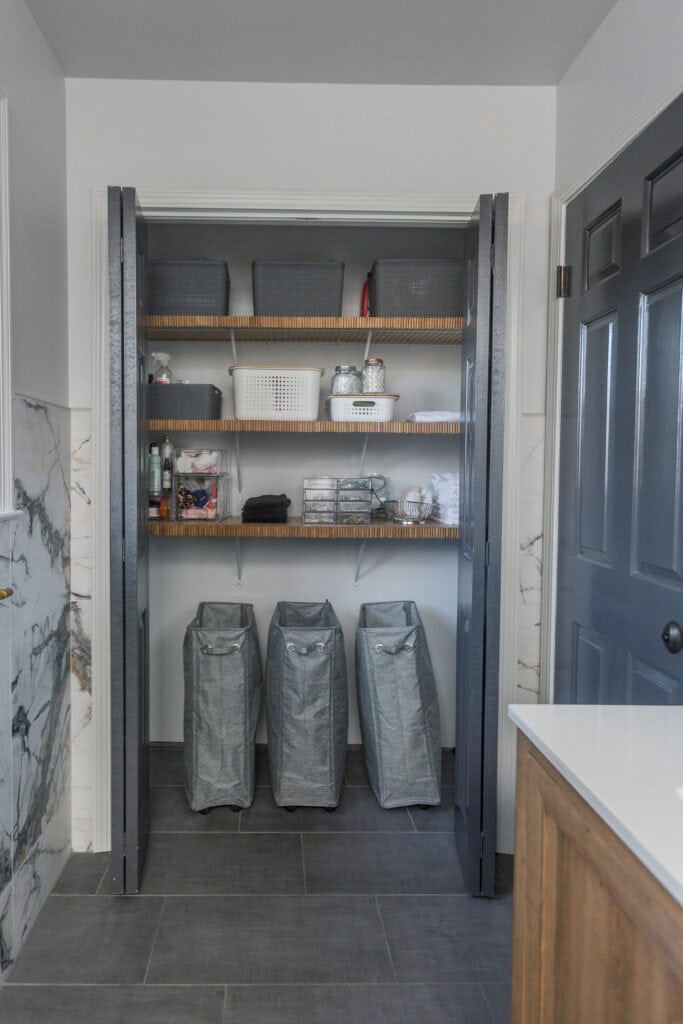
This post is about our wire shelf cover tutorial and bathroom closet makeover.
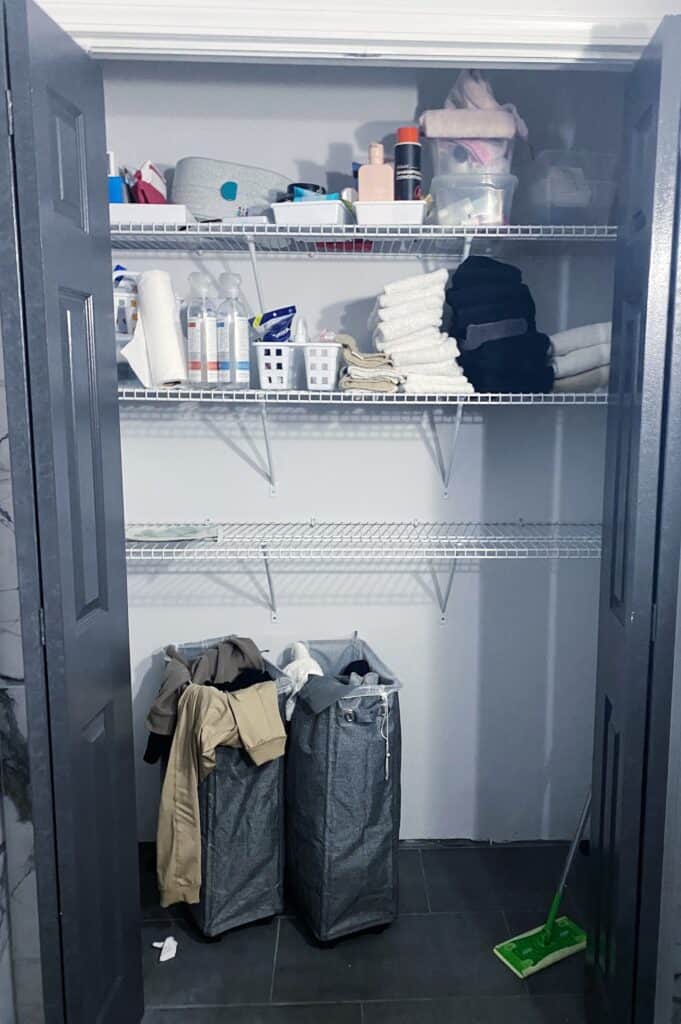
For a few years I had seen before and afters of pantries and bathroom closets that had been made over by adding wire shelf covers. The results looked great but I never felt totally convinced that the effort was worth it- until I figured out a way to take the look up another notch.
Why Make Wire Shelf Covers?
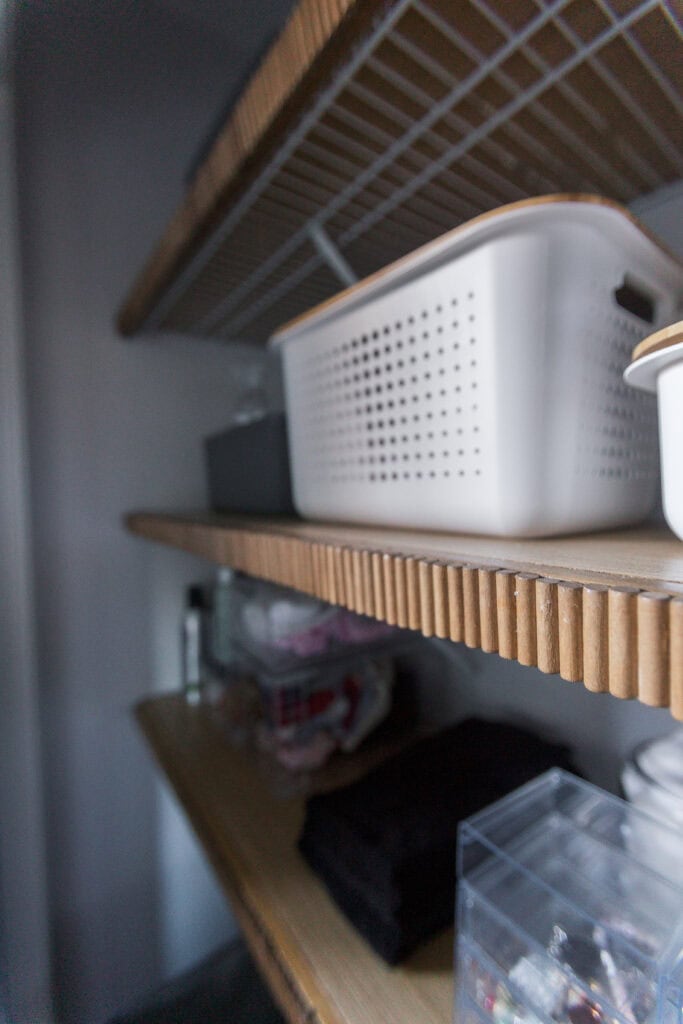
Wire shelving is practical, but let’s be honest—it’s not the most stylish or functional option. Items can tip over, small things fall through the gaps, and the overall look often feels cheap. The good news? You don’t have to rip them out! Instead, you can create DIY wire shelf covers to achieve a high-end, built-in look without the cost of custom shelving.
In this tutorial, I’ll show you how I made wooden shelf covers with fluted trim for my bathroom closet makeover. This simple yet effective DIY will instantly elevate your space!
My Secret Sauce To Elevated Wire Shelf Covers
After we totally remodeled our primary bathroom I began to see how much of difference all the little details made. The prettier our bathroom looked the more I wanted to keep it clean and organized and so, I circled back around to the idea of wire shelf covers.
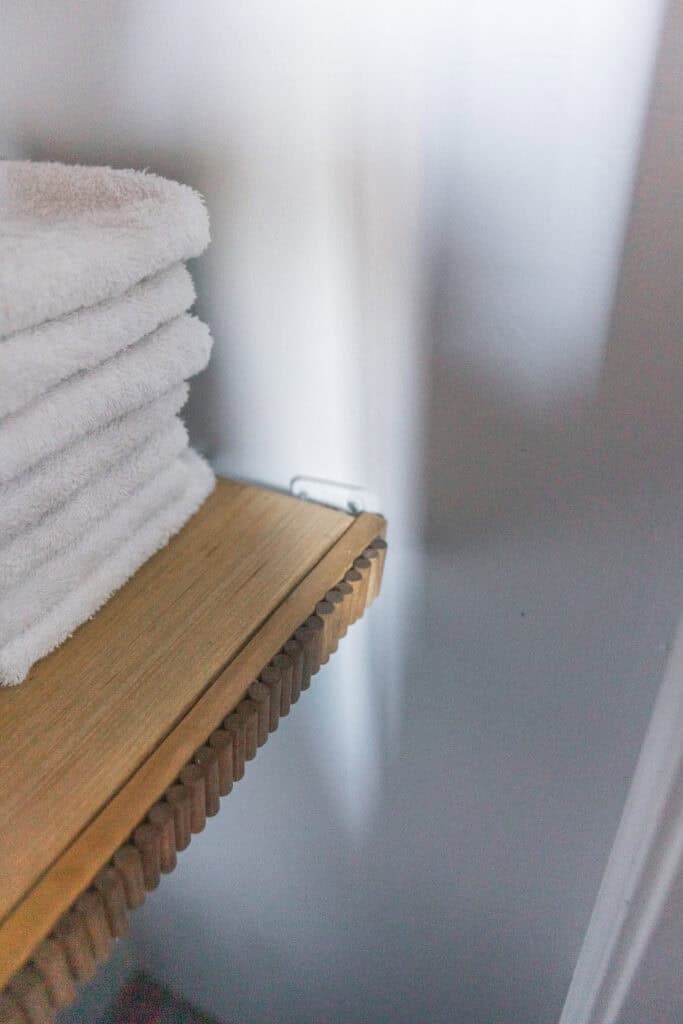
I knew if I was going to invest the time into making the shelf covers I wanted to elevate the look a little more and since I love fluted/reeded elements and have that several other places in the house I decided that fluted trim on the face of the shelf covers would add the touch of design that I wanted.
Options For Fluted Trim on Wire Shelf Covers
Here are the options I considered for how I would make the fluted wooden face trim:
- Pole Wrap: I think this is an awesome option and it would look great but I personally prefer the more rounded fluted/reeded wood look as opposed to the angular edges for pole wrap.
- Panels of Fluted Wood: This is an amazing option and you would just have to cut the panels down into rows. The only reason I didn’t choose this option is because I was trying to keep the price as low as possible.
- Rolls of Flexible Fluted Wood: Also a great option and my reason for not doing this was also price.
- Use a Router to Make Your Own: I have done this in the past and it absolutely is the least expensive option but it takes a long time and it is cold outside right now so I didn’t want to spend that much time outside with my router. If you do go this route, I like this bit.
- Buy Dowel Rods and Cut Them: This is the option I chose because I found an incredible deal on dowel rods at the Dollar Tree (except now that I just searched I found the same ones on Amazon for even much less). This was for sure not the easiest option but it was the cheapest! My tutorial will include using dowel rods but if you can swing options 2 or 3 then go for that by all means.
Supplies You’ll Need
Before getting started, gather these materials:
- 1/4″ Plywood boards (cut to the size of your wire shelves)
- 1X2 Stripes of wood for the edging
- Fluted trim or decorative molding or dowel rods
- Wood glue or construction adhesive
- Wood Clamps
- Sandpaper (120, 320, & 600 grit)
- Paint or stain (to match your decor)
- Polyurethane Sealant
- Measuring tape & pencil
- Saw (table saw or circular saw/track saw if you cut your own plywood)
- Miterbox and Saw or Miter Shears (I have not tried these but I think they would work well
Steps to Making Your Custom Wire Shelf Covers
Step 1: Measure Your Wire Shelves
When measuring the length of each shelf you want to measure only the flat surface and not wall to wall. Some wire shelves will have brackets at each end that bump in and would cause the plywood you are placing on top to not be completely flat. You don’t want the plywood to bow so just measure the area that is completely flat.
For the depth measurement you will want a slight overhang so that the edging can be glued to it and make a nice even perpendicular right angle to the plywood base.
Step 2: Figure Out How Many Dowel Rods or Fluted Panels You Will Need
Once you know the length of each shelf and have decided on the height of your fluted edging (I used 1 1/2″) then you will need to do some math and figure out how many dowel rods you will need to purchase.
For instance: I had 3 shelves that were each 84 inches long. Each dowel rod was 12″ long.
If I divided 12″ by 1.5″ I learned I would get 8 fluted pieces per dowel rod.
These dowel rods are 1/4″ in diameter so it takes 4 of them lined up in a row to equal one inch. Since I needed 252″ worth of dowel rods (84″ X 3 shelves) then that meant I needed 126 whole dowel rods (each dowel rod gives 8- 1/4″ pieces which equals 2″ of fluted trim per dowel rod so 252/2).
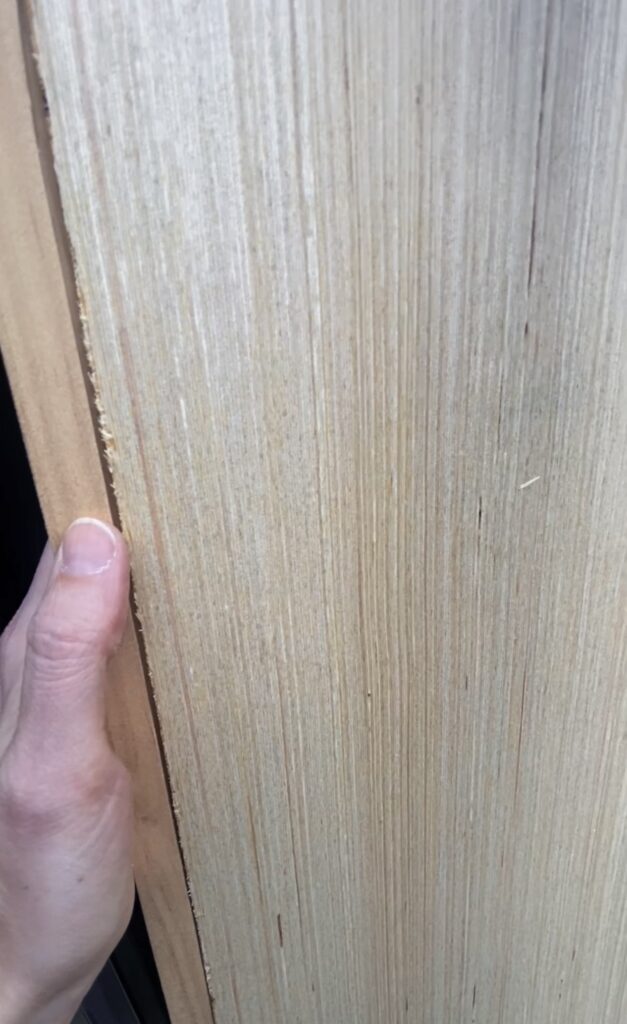
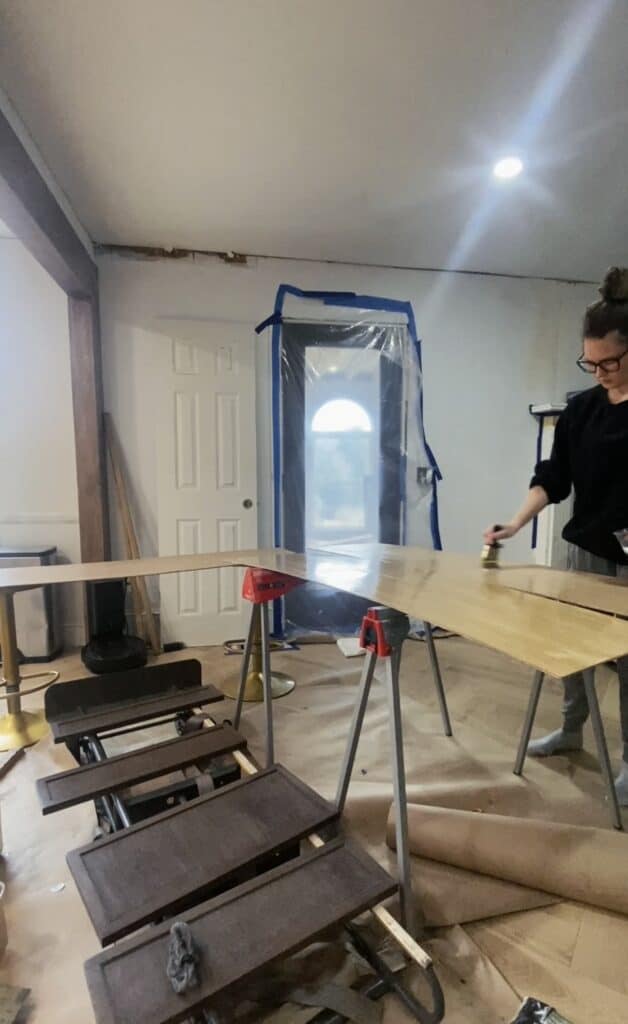
Step 2: Purchase and Cut Plywood
You can use whatever thickness of plywood you want if your shelves are not inset like mine. If you don’t have a direct shot to the sides of each shelf then I highly suggest you use 1/4″ plywood because you will want/need to be able to bend the plywood a bit to get it to fit over the wire shelving.
I also suggest you purchase a high-quality plywood that is free of maring and definitely free of mold or water stains. There is a brand that is formaldehyde free that I recommend and use.
If you measured well then the easiest thing to do is to just have your plywood cut at the hardware store. If the calculations were off or you just like to cut your own wood then you’ll want to use a table saw or a track saw. I used a table saw this time but I really love this affordable WEN track saw that my friend Brian that is a pro woodworker suggested.
Step 3: Check to See if Plywood Fits
Before you do anything else, bring your plywood covers in and see if you can get them onto the shelves and if they fit. If they are too big you’ll want to trim them now before sanding.
Step 4: Purchase and Cut Edging Strips
You can use any thickness and width of edging strips but I used 3/4″ X 1 1X2″ and I like how it turned out. The length will be the same as the length you cut the plywood to.
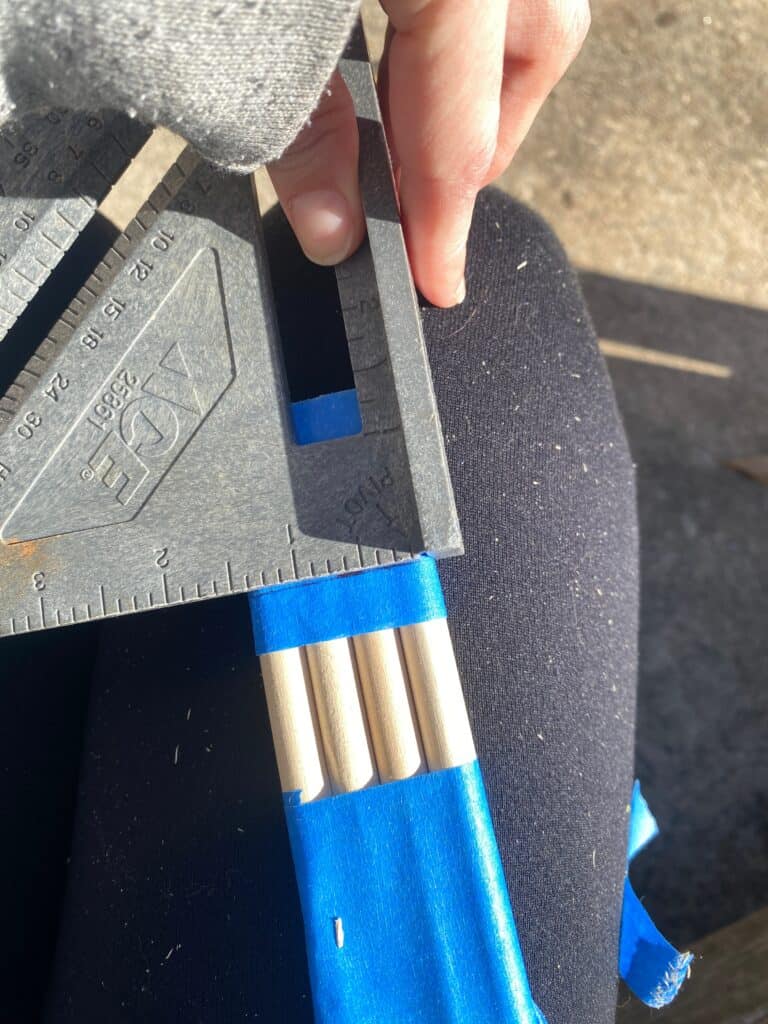
Step 5: Make a Notch At the Top of Edging
I wanted to be able to glue my edging to the plywood and also wanted to not see the top of the plywood when I looked at the shelves. To achieve this goal I used my table saw and lowered the blade so that when I ran the 1X2 edge piece over it on one side it would make a little notch at the top edge.
Since the plywood is only 1/4″ the notch did not need to be very deep or long at all. You can use a chisel or razor blade to clean this up if areas don’t come out as clean as you want.
Looking back, a good alternative if you don’t have a table saw or feel comfortable doing this would simply be to cut your dowel rods 1/4″ longer than your edging panel and then recess the plywood behind the overhang of the dowel rod and on top of the edge panel with glue.
If you do the latter suggestion just test out the placement before you glue the dowel rods so that you don’t have too much overhang of the dowel rods and everything has flush look.
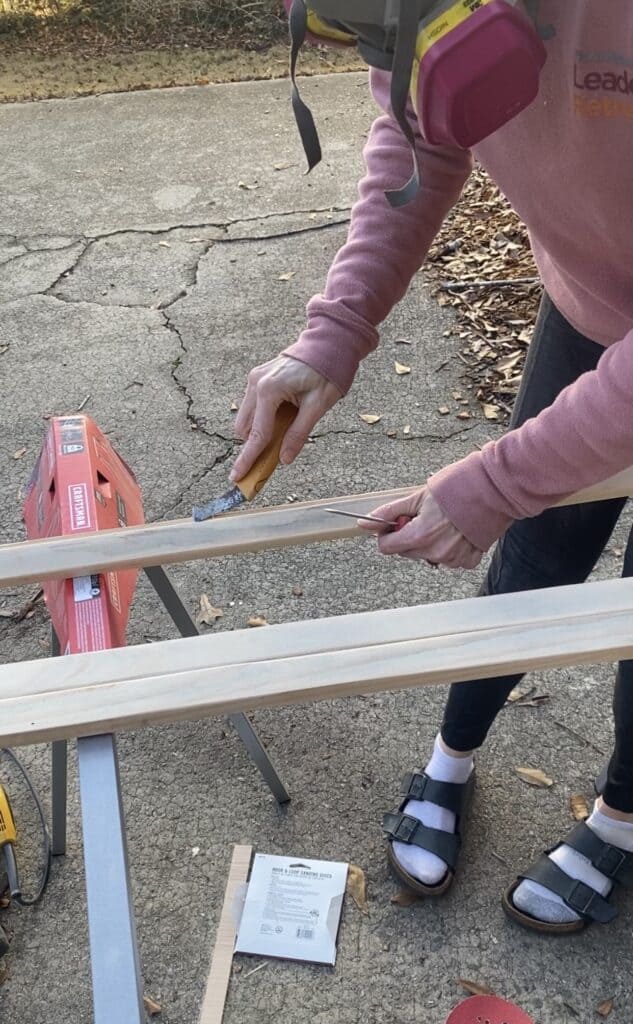
Step 6: Sand Plywood and Edging
Sand everything to get rid of rough edges.
Step 7: Cut Dowel Rods or Fluted Panel
Cut your fluted panels or dowel rods to size. If you are using a 1×2 then the nominal height of the edging will be 1 1/2″ so your dowel rods or fluted panel could be cut anywhere from 1 1/2″ or more. If you are going to recess your plywood behind then you’ll just want to remember to add 1/4″.
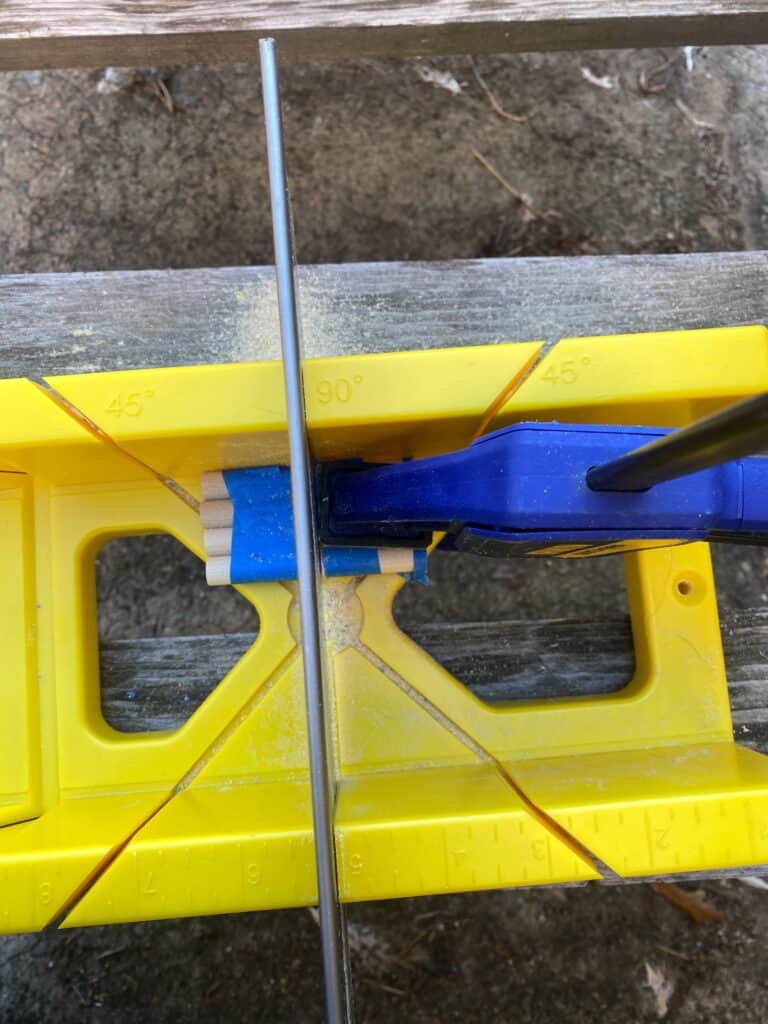
If you use a fluted panel you should be ok to use a miter saw to cut. your paneling. Using painters tape where you will cut might help reduce any splintering.
I tried bundling my dowel rods and using a miter saw but they started to split and fly and it felt dangerous so instead I decided to purchase and use this miter box and saw combo. This worked great- it took a long time but it greatly reduced splintering.
I would also be interested to try miter shears but I don’t yet own any.
Step 8: Sand Dowel Rods/Fluted Panels
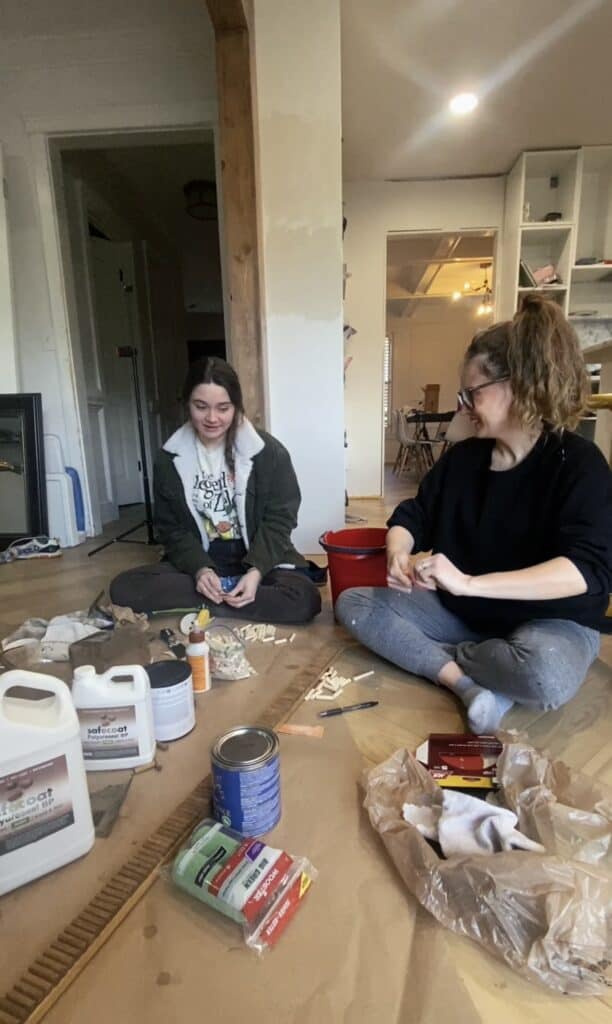
Sanding the dowel rods took a long time so if you go this route put on a movie and/or enlist some help. This little mini-sanding tool was very useful.
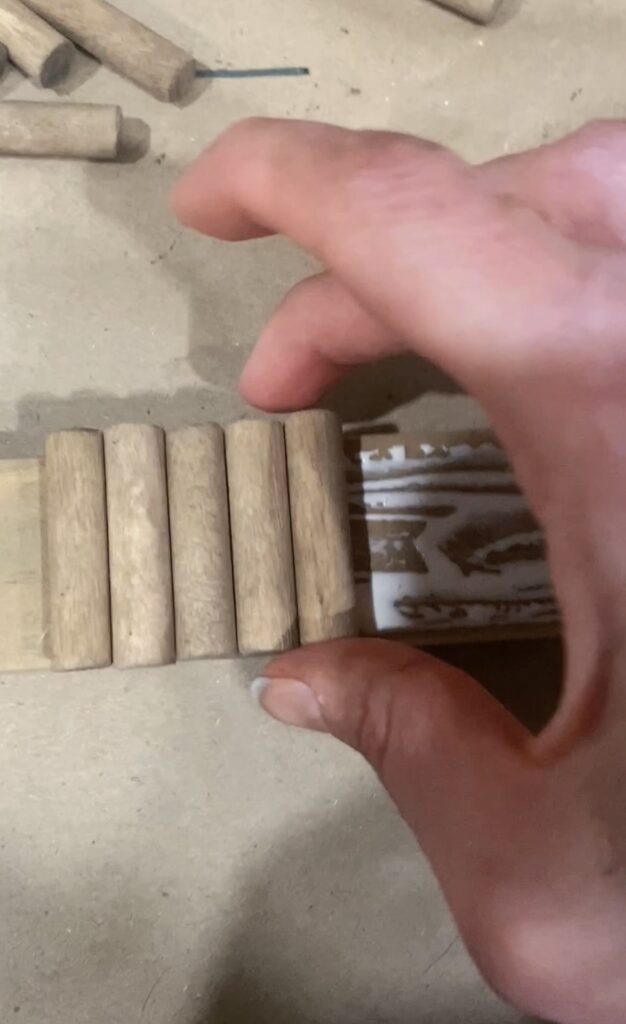
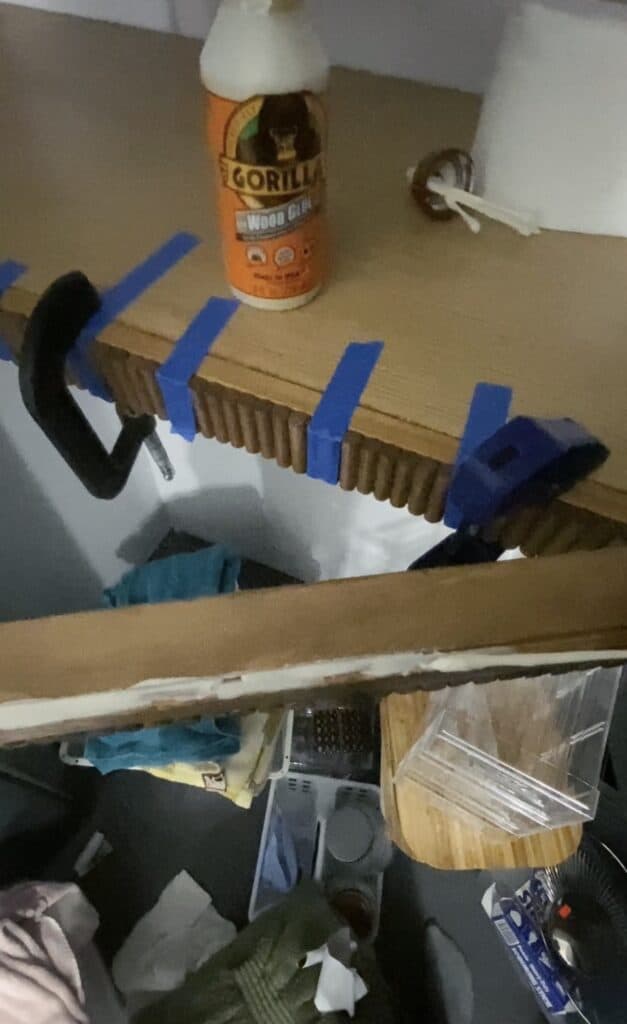
Step 9: Glue Dowel Rods or Fluted Panels to Edge Panel of the Wire Shelf Covers
This part was very easy. I used Gorilla wood glue to glue each dowel rod to the 1X2 edge pane. You want to be careful to not get wood glue on the front because that will make it not take stain. Don’t forget to plan for if you need to inset the plywood behind the dowels.
You are going to want the top of the dowel rods to be flat and even.
PRO TIP: I learned the hardway on the first panel that the dowel rods are not going to all be the same length- even if you measured and were careful- the just aren’t so lay them out beforehand so it looks more uniform and the change in height is gradual.
I chose to put the tallest rods in the middle of the edge piece and very gradually taper as we went out to each end. This way the finished product looks straight. I also chose to put my first set that looked more up and down on the lowest shelf below eye level so it wasn’t noticeable.
Step 10: Stain Everything
Once the glue has dried it’s time to stain the shelf pieces.
What color of stain and what type of stain you use is up to you. I wanted the wire shelf covers to match our bathroom vanities so I went with an oak stain. I like to use non-toxic wood stain from ECOS but you can use any type.
Regardless I always use a waterbase stain because they are less toxic.
Step 11: Seal Wire Shelf Covers with Polyurethane
If you used a waterbased stain you’ll use a water based and not oil based polyurethane to seal. I suggest using 2-3 coats on all pieces and all sides to make sure they are protected from any humidity i.e. mold growth and are easy to clean.
Inbetween each polyurethane coat (of course let each coat dry before adding another per instruction son the sealant’s container) I like to sand lightly with a 320 sand paper. At the very end I lightly go over with a 600 grit sandpaper to make smooth.
Step 12: Deep Clean Wire Shelves
If you haven’t already, go ahead and give those wire shelves a really good scrub and clean. Get into all of the little weird crevices. Now that you will have covers you won’t have to clean these very often so do a good job now.
I LOVE BranchBasics for any cleaning like this. I also suggest grabbing some Smart Rags and some Qtips to help the process.
Step 13: Fit Plywood On Top of Wire Shelves
Once everything is dry, place only the plywood shelf covers on top of each wire shelf cover. Remember these have a little flex so if you need to arch them slightly to make them contort into the space then it should be ok.
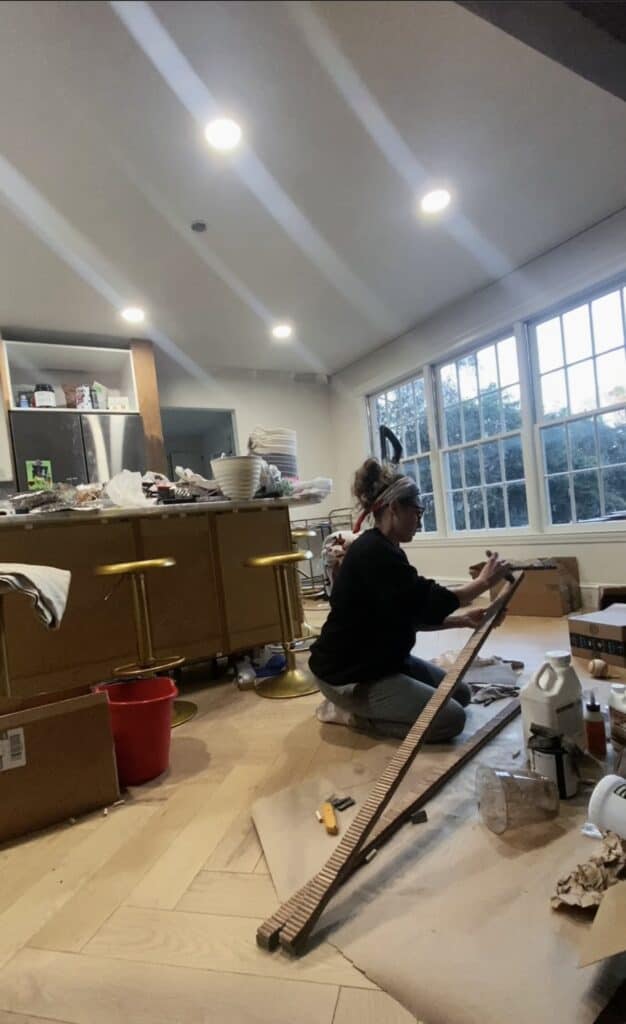
Step 14: Attach Fluted Edging to Plywood
Using a strong adhesive (Gorilla Glue Wood Glue worked fine for me) attach the edging to the plywood. If you created the little dado shelf on the edge panel then the plywood should lay nicely into that shelf like slot.
If you made your panel/dowel rods a little longer then you should be able to glue the plywood to sit on top of the edge panel and the fluted dowel rods should cover it up so can’t see the plywood.
I used wood clamps as well as painter’s tape to secure the plywood to the edging. You will either need about 4 clamps per shelf or you will want to do one shelf at a time, letting each one totally dry before unclamping.

Step 15: Remove Clamps and Tape
Once the glue has dried (each glue is different so read the back of the bottle) then you should be able to unclamp and untape it all. I did have one little area that was pulling away so I added more glue and more clamps to make it more secure.
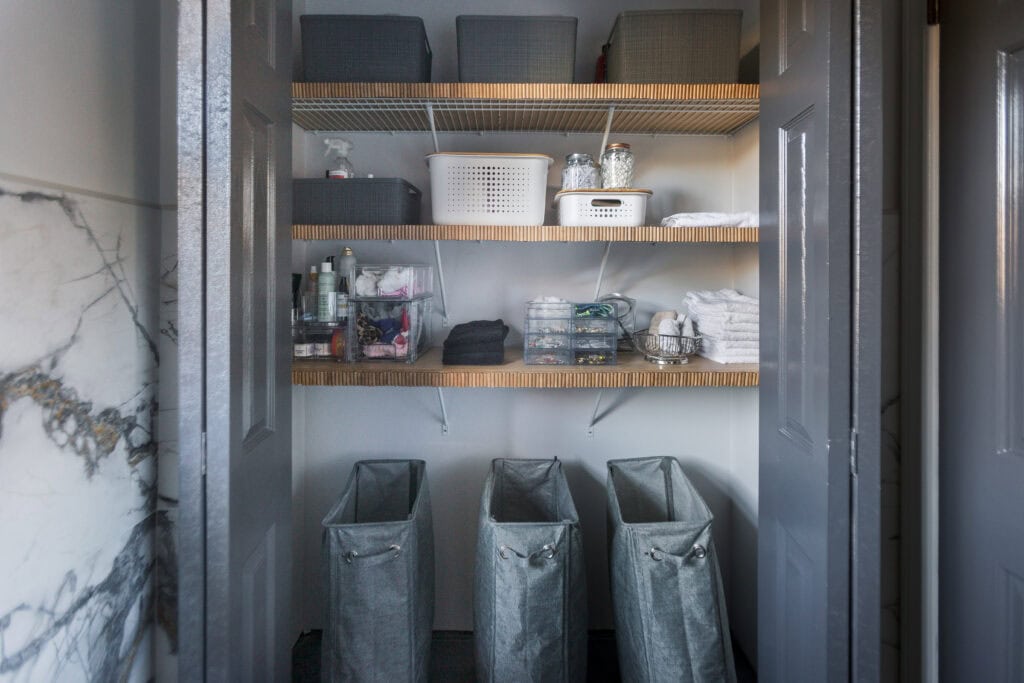
Final Thoughts on These Wire Shelf Covers
I’m learning that the more I love the design of a space and the more I have specific and functional organization of a space the more I want to keep that space clean and tidy and the easier it is to do so.
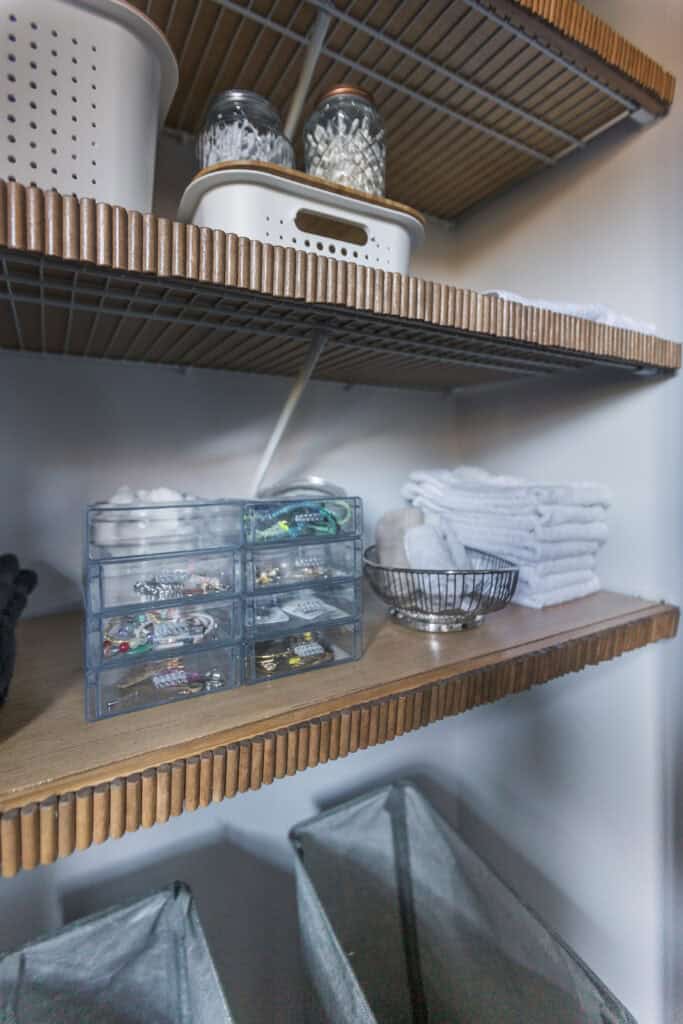
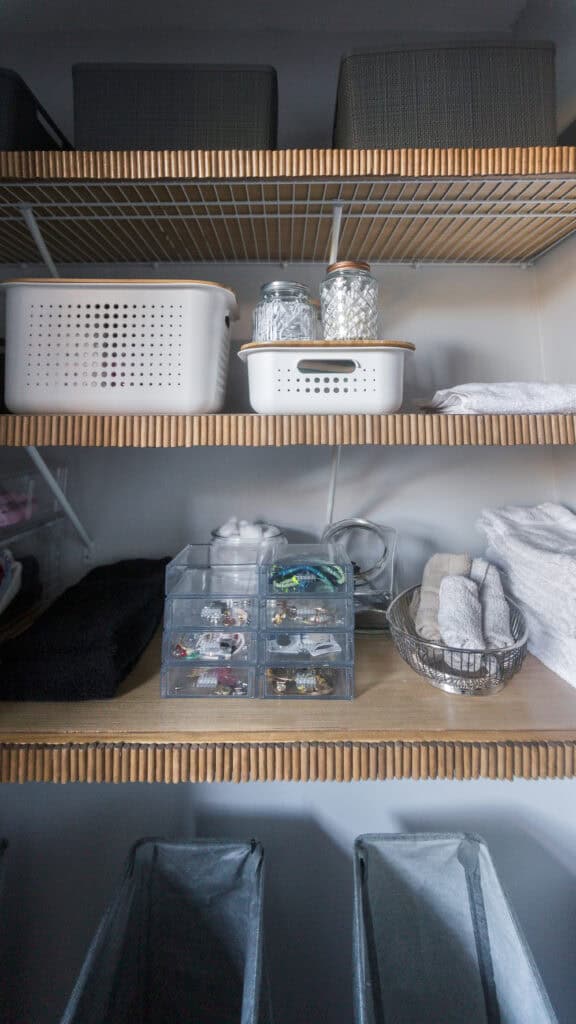
These wire shelf covers with fluted detailing make me so happy. I never would have thought that I would enjoy how my bathroom closet looked. It literally makes me happy and makes me feel less stressed because the once messy space looks so much more visually cohesive.
If you have the extra cash then I suggest buying the fluted panels- it will greatly cut the time you spend on this project down as most of my time was spent cutting the dowel rods with a hand saw and sanding each rod.
If you decide to give this wire shelf cover project a go and post it on social media, please tag me so I can see it! Instagram.com/ashbrockinton or tiktok.com/the.handsome.home.
This post was about wire shelf covers.
MORE POSTS LIKE THIS:
The Top 5 Products for Organizing Your Bathroom Closet from The Container Store