How I Built a Custom Beverage Bar with Bistro Shelves
This post is about how I took a blank and unused wall in my kitchen and turned into the beverage bar of my dreams.
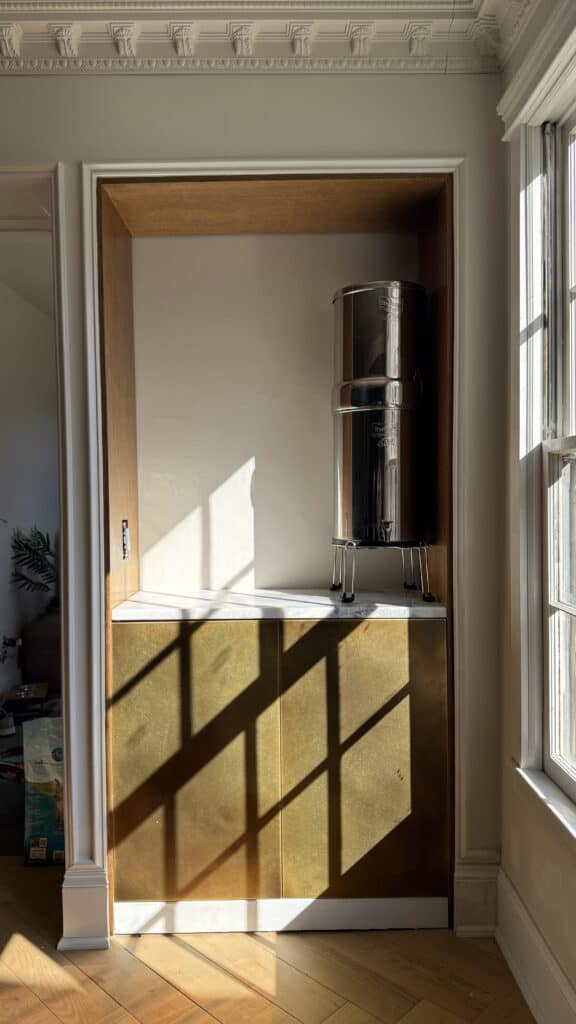
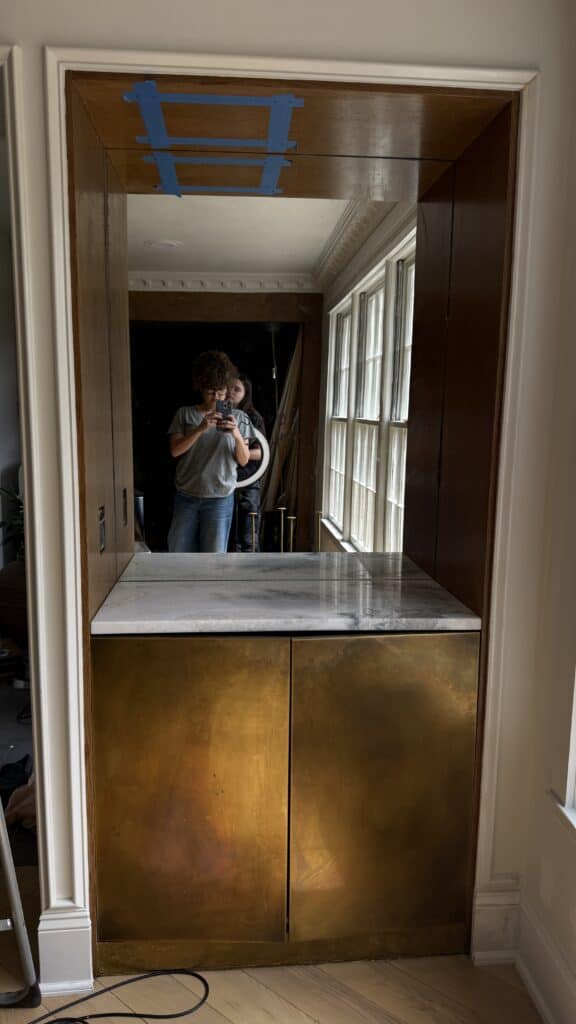
This custom-looking beverage bar started as a completely blank wall in our kitchen. It was one of those awkward dead spaces that wasn’t really doing anything, but we had one very specific problem: our big Berkey water filter had nowhere pretty or practical to go.
Instead of letting it sit awkwardly on the main kitchen counter, I decided to turn that unused wall into a built-in beverage bar nook. I wanted the space to function for everyday life — filtered water, tea, glassware, mugs, and our kettle — but I also wanted it to feel more like a traditional styled bar with marble, mirror, brass details, and pretty open shelving.
So I built the whole beverage bar from scratch. I framed the nook with 2x4s, added an IKEA base cabinet, wrapped it with a stained white oak surround, used a marble remnant for the counter, cut a piece of mirror to fit the back, and added custom brass details to make it feel much more high-end than it actually was.
The finishing touch was the Riviera bistro shelves from Iron Abode in the antiqued brass finish. Iron Abode gifted the bistro shelves for this project, but all design choices, DIY decisions, and opinions are my own. The shelves ended up being the detail that made the entire bar feel finished and intentional. They gave me a place to display glassware, pretty everyday pieces, and a few collected finds while turning a once-useless wall into one of my favorite custom-looking moments in our kitchen.
This post contains affiliate links.
Turning a Blank Kitchen Wall Into a Beverage Bar
This beverage bar started with a completely blank wall in our kitchen. It wasn’t ugly exactly, but it also wasn’t doing anything useful. It was just flat, empty space in a room where every square inch really needed to earn its keep.
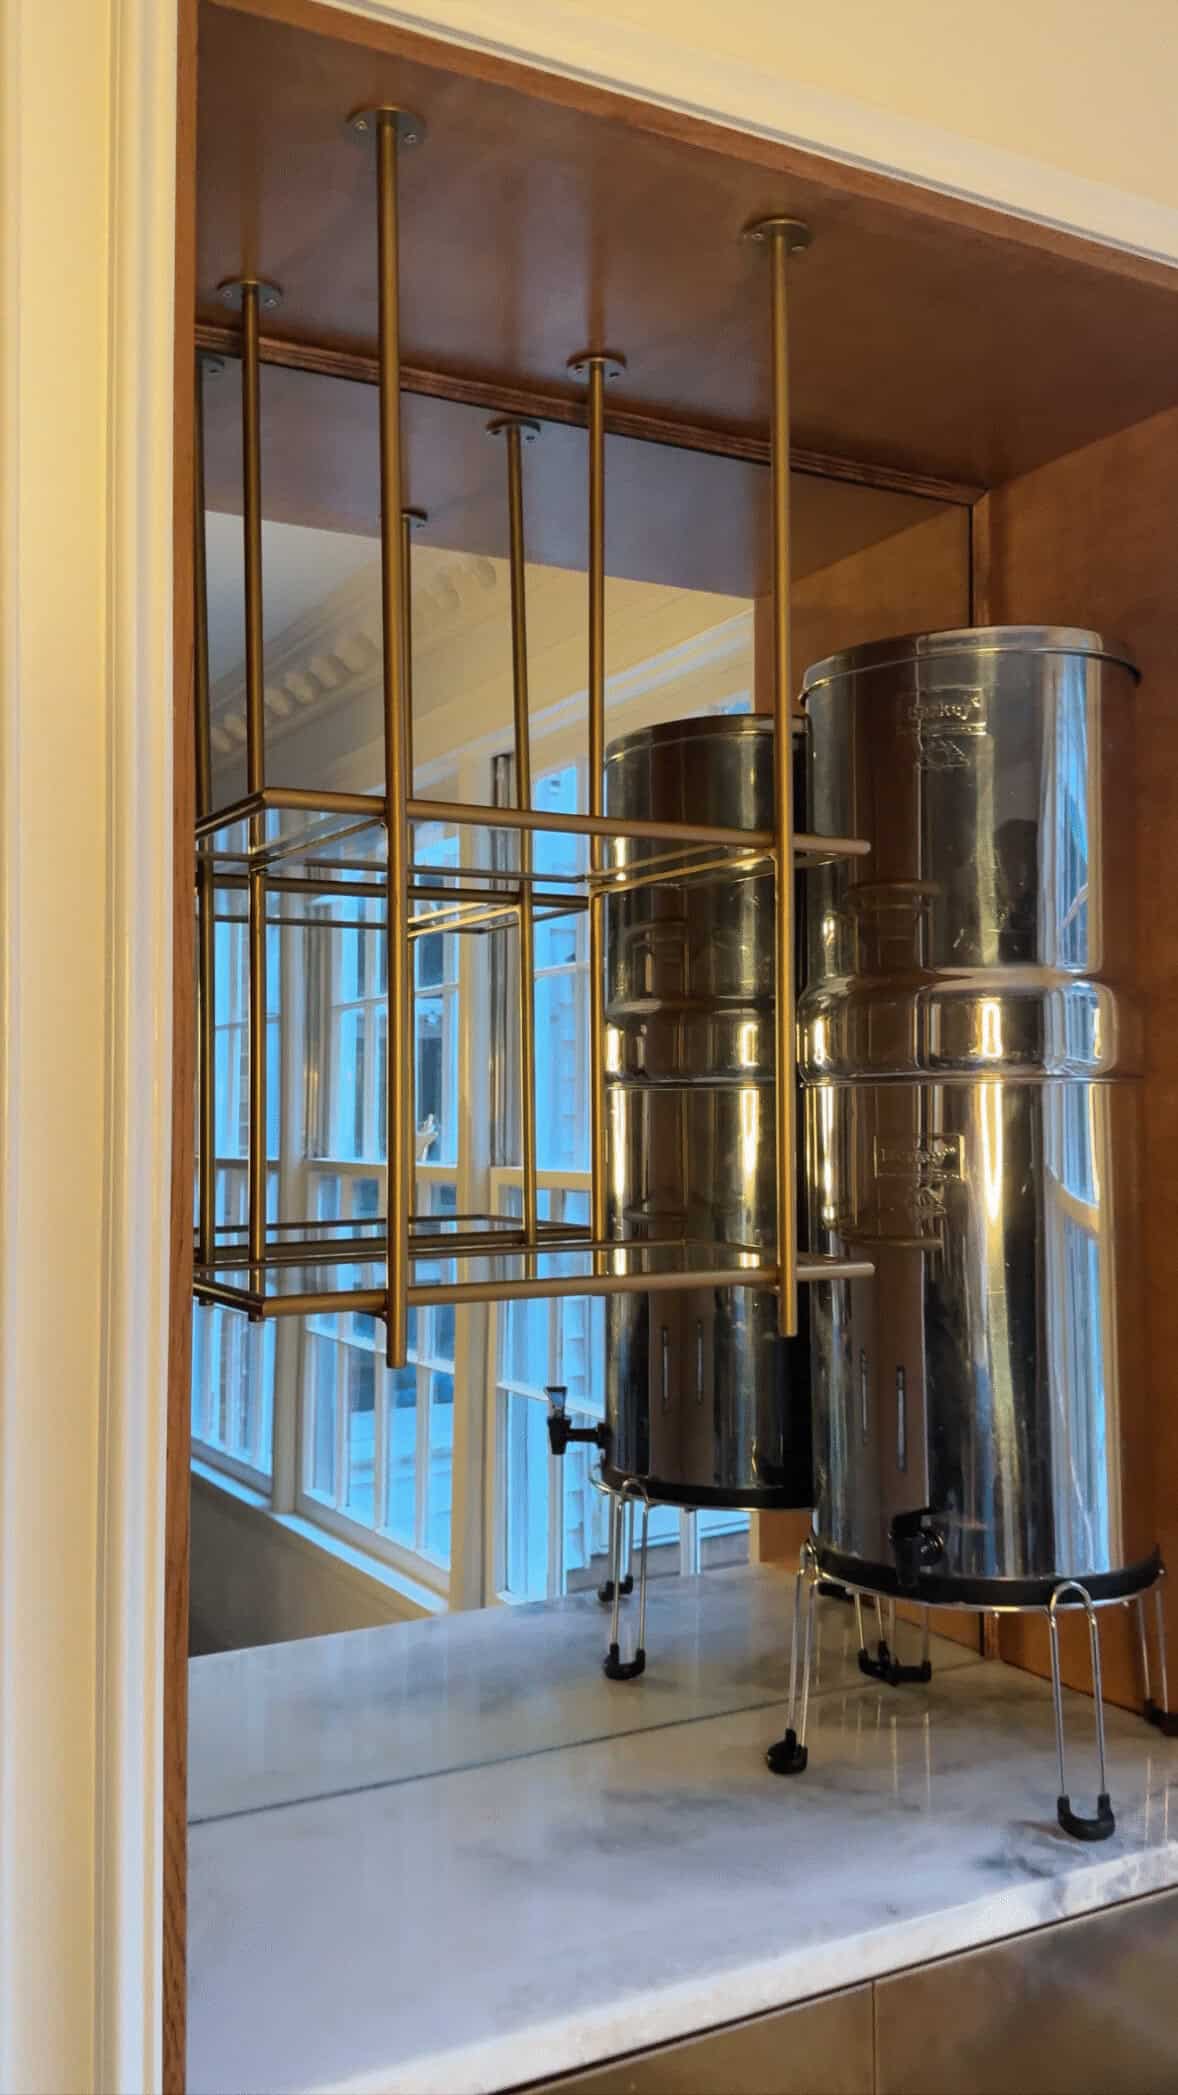
The main problem was our Berkey water filter (side note, we LOVE our Berkey but if I were to buy again it looks like the new it gravity filter is a Boroux). We use it every day, but it is not exactly a small appliance you can tuck away in a drawer. It needed to be accessible, sturdy, and close to where we actually use glasses and mugs, but I didn’t want it sitting randomly on the main kitchen counter forever. I wanted it to have a home.
At first, I was really just trying to solve a practical problem: where do you put a large water filter in a kitchen so it is easy to use but doesn’t feel like clutter? But the more I thought about that blank wall, the more I realized it could become something so much better than a storage solution. It could become a built-in beverage bar.
I loved the idea of styling it like a traditional bar, but making it function for our real life. Instead of bottles and cocktail tools being the main focus, this would hold filtered water, glassware, mugs, tea, beverage powders, our kettle, and a few pretty everyday pieces. Basically, all the things we actually use, but gathered into one intentional little nook.
That was the goal from the beginning: take a dead wall in the kitchen and turn it into a custom-looking beverage bar that felt beautiful, useful, and built into the room. I wanted it to look like it had always belonged there — not like I shoved a cabinet against the wall and called it a day.
The Design Plan for the Built-In Beverage Bar
Once I decided this blank kitchen wall was going to become a beverage bar, I knew I didn’t want it to look like a random cabinet sitting against the wall. I wanted it to feel built in, intentional, and more like a little architectural moment in the kitchen.
The practical goal was simple: create a sturdy, accessible place for our Berkey water filter, with storage underneath for extra glasses, mugs, tea, and other beverage powders. But the design goal was a little more fun. I wanted the finished space to feel like a traditional bar, just reimagined for how our family actually uses the kitchen every day.
That meant I needed the beverage bar to have a few key elements: a real countertop, a pretty backsplash, storage below, display space above, and finishes that tied into the rest of the kitchen. I wanted it to feel custom-looking without having to order a fully custom cabinet or hire out the entire project.
The plan was to build a framed nook from scratch so the bar would feel like part of the room. Then I could add a base cabinet inside the opening, wrap it with stained white oak, and use a marble remnant for the counter. I also wanted a mirror on the back wall to give it that traditional bar feeling and help the small nook feel brighter and more layered.
From the beginning, I knew open shelving would be important. Upper cabinets would have made the space feel too heavy, and simple wood shelves didn’t feel quite special enough for the look I wanted. The bistro shelves were the perfect solution because they gave me the function of open shelving, but with a much more polished, collected, high-end look.
I wanted the shelves to hold glassware and pretty everyday pieces, but I also wanted them to be one of the main design features of the bar. The antiqued brass finish tied in with the brass cabinet doors and the warmer details in the space, while the glass shelves kept everything feeling open instead of bulky.
The overall plan was really a mix of high and low: an IKEA cabinet, secondhand marble, a Facebook Marketplace mirror, DIY trim work, custom brass details, and statement bistro shelves. I wanted the finished built-in beverage bar to feel elevated and custom, but still practical enough for everyday water, tea, coffee, and all the little drink things that usually end up scattered around a kitchen.
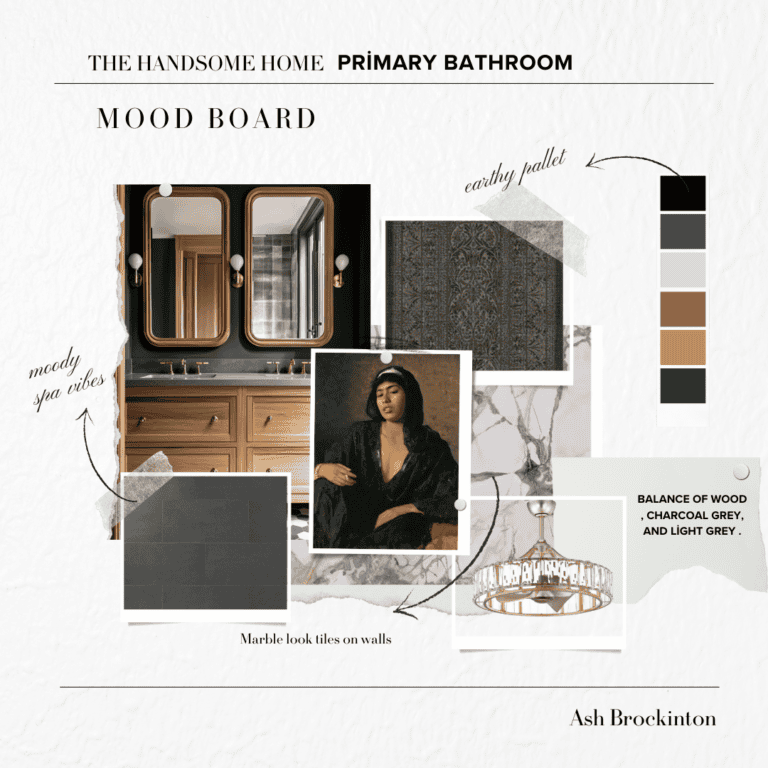
The Pinterest Inspiration Behind the Bar
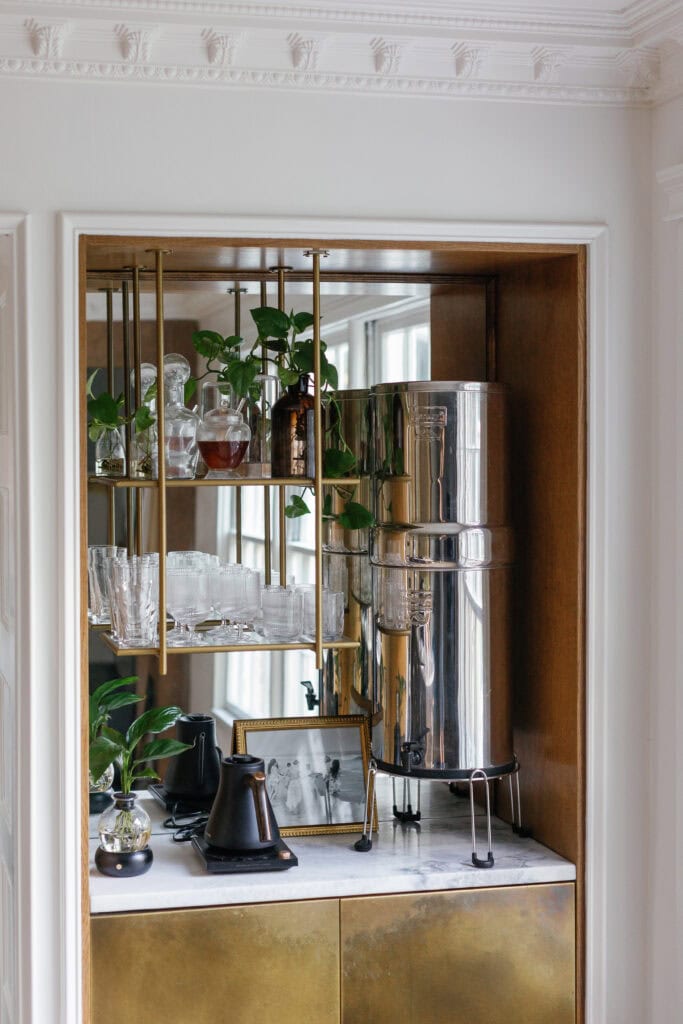
A big part of the design inspiration came from a bar cabinet image I had saved on Pinterest from Jaimie Baird Design I loved the traditional feeling of the mirror, brass, glass shelving, and built-in details, but I knew I needed to reinterpret the look for our kitchen and for the way we actually live.
Instead of creating a formal cocktail bar, I used that inspiration as the starting point for a practical beverage bar — a place for our Berkey water filter, kettle, glassware, mugs, tea, and everyday drink essentials. The goal was not to recreate the inspiration image exactly, but to borrow the feeling of it: layered, polished, traditional, and custom-looking. Here was my inspo- I was so obsessed with this look that I followed it as closely as I could afford to (champagne taste on a beer budget).
Framing the Bar Nook from Scratch
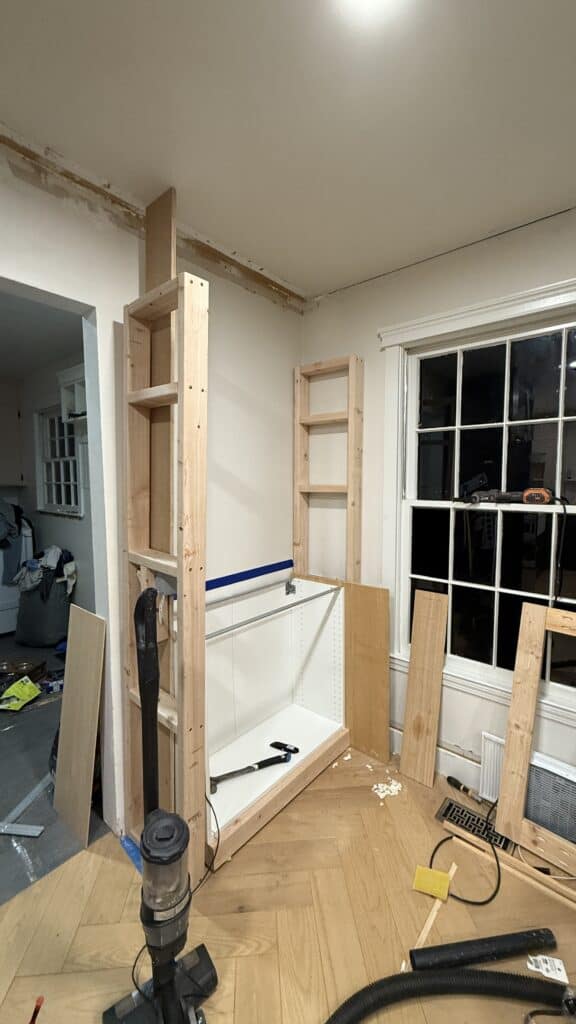
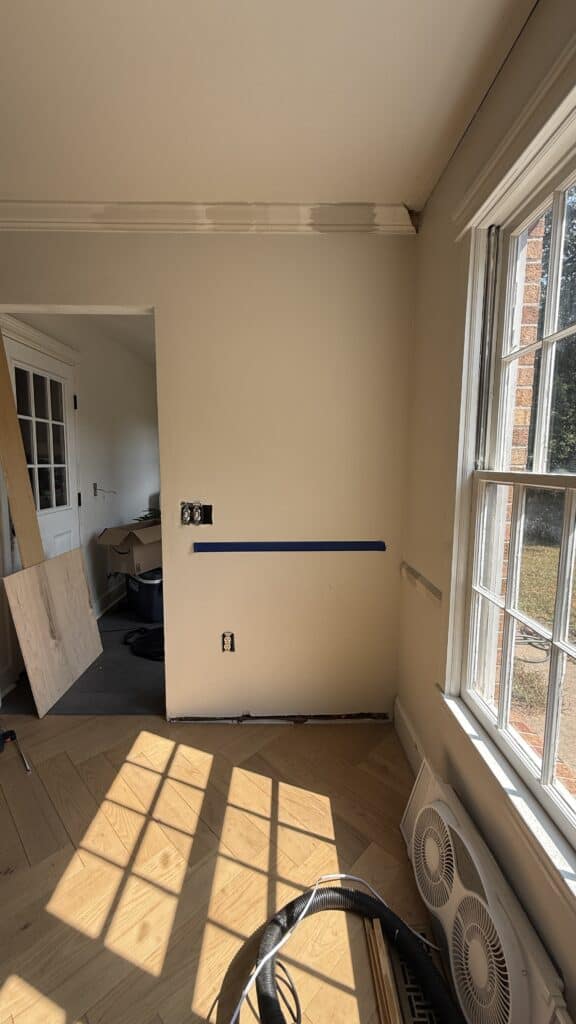
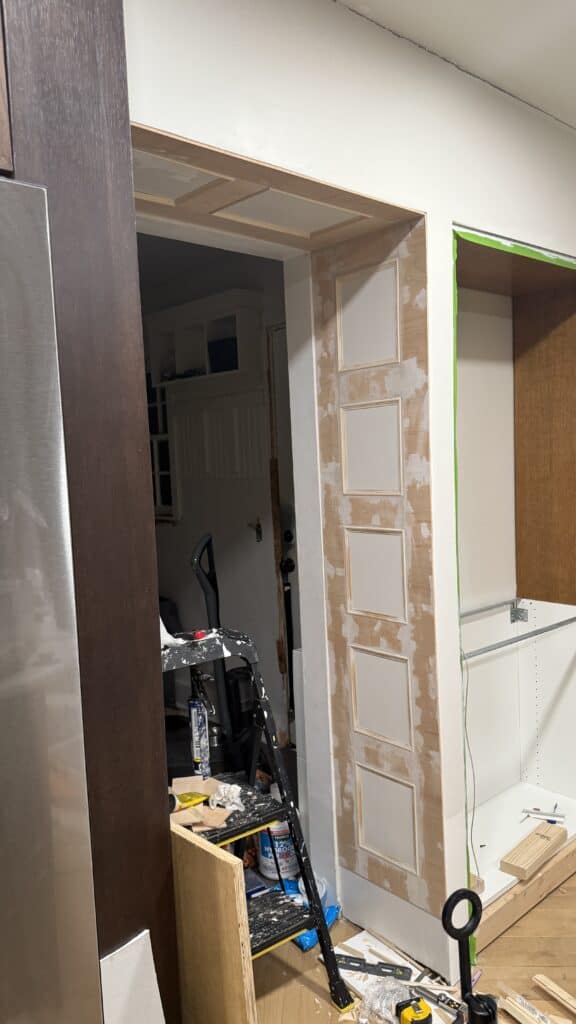
Once I had the design plan in my head, the first step was turning the flat wall into an actual built-in bar nook. I didn’t want this to feel like a piece of furniture pushed against the wall. I wanted it to look like it had been built into the kitchen from the beginning, so I started by creating a frame with 2x4s.
The 2×4 framework (use kiln dried and not pressure treated, which have chemicals) gave the beverage bar its shape and depth. It created the sides and structure of the nook so the cabinet, counter, mirror, and shelves would all sit inside an actual built-in opening instead of floating on a blank wall. This was the part that really changed the project from “cabinet against a wall” to “custom-looking built-in bar.”
Building a stud/frame wall that is not load bearing is WAY easier than it seems. Here’s a video I found on how to build the framing… it’s literally just connecting 2X4s with nails or screws at the correct distances for structural integrity).
I also built a raised base from 2x4s for the bottom cabinet to sit on. Raising the cabinet made it feel more substantial and helped the whole beverage bar look more intentional because I wanted to add baseboards. It also gave me the right proportions so the counter, water filter, and bistro shelves would all work together visually.
Before closing everything in, I had the outlet moved so it would be inside the bar area instead of sitting awkwardly on the wall behind it. That little detail made a big difference in how clean and finished the space felt. We use this area for our water filter, kettle, and other everyday beverage things, so having power inside the bar nook made it much more functional. As always, electrical work should be done safely and according to local code. If you do swap out or move an outlet I sugget using an outlet that has usb or usb-c portals so you can charge your phone or another device if needed.
At this stage, it still looked pretty rough, but the bones were there. The blank wall finally had depth, structure, and a purpose. It was starting to feel like a real built-in beverage bar instead of just an idea I had because our Berkey water filter needed somewhere to live.
Adding the Cabinet, White Oak Surround, and Drywall
After the bar nook was framed, drywalled, and starting to feel like an actual part of the kitchen, it was time to add the pieces that would make it function like a real built-in beverage bar. I wanted storage below, a sturdy counter for the water filter, and finishes that made the whole thing feel more custom than it actually was.
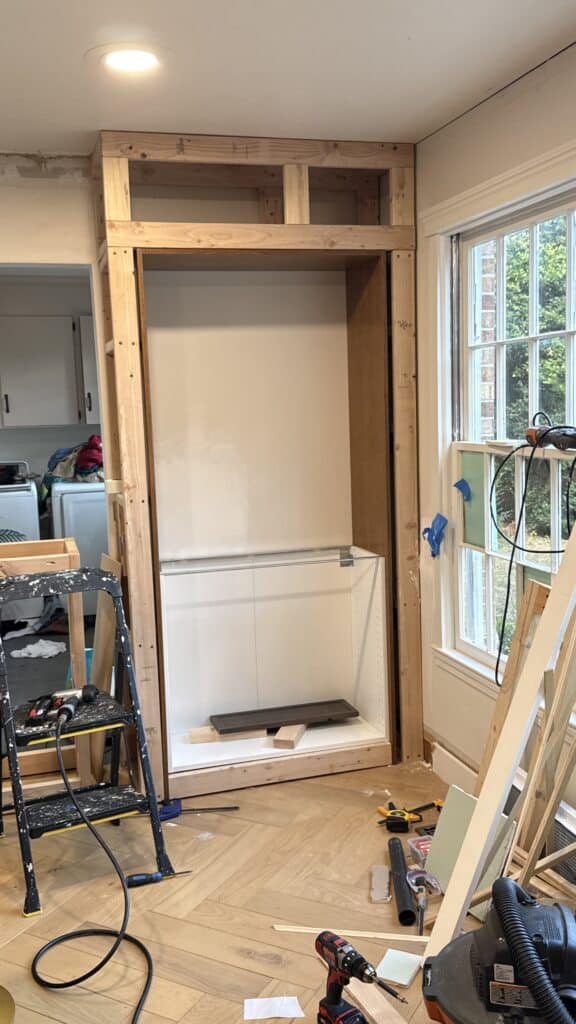
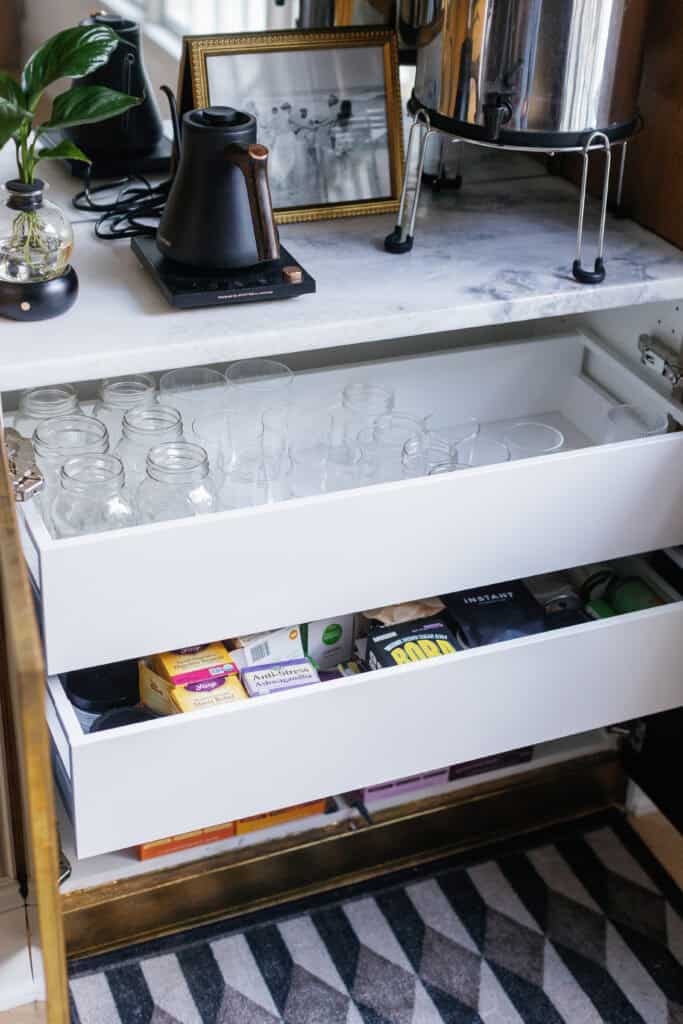
For the base, I used an IKEA bottom cabinet. This gave me practical storage without having to build the entire cabinet box from scratch. Since the cabinet would be tucked inside the nook, I knew I could make it look much more custom by building around it instead of relying on the cabinet alone to carry the whole design. I installed two drawers in the cabinet for storage.
I set the cabinet on the raised 2×4 frame I had already built, then created a white oak surround to fit around the cabinet. The white oak frame helped the cabinet feel built-in and gave the whole bar more of a furniture-like look. I stained the wood in Early American, which added warmth and contrast against the Benjamin Moore China White paint used on the rest of the built-in.
One of my favorite parts of this project is that the final beverage bar looks much more expensive than the individual pieces actually were. The base is an IKEA cabinet, the surround is DIY (I took 3 pieces of white oak plywood, stained them with early american stain, used pocket holes and screws to attach them (use this calculator to find what length pocket hole screws you need) and then slid it into the frame so it created an inset contrast instead of just having drywall on all sides above counter).
After the framing was finished and the cabinet was installed, I covered the 2x4s with drywall, then taped and mudded everything so the new structure blended into the kitchen. This step was messy and not especially glamorous, but it mattered so much. Drywalling the frame made the bar nook feel like part of the wall instead of a DIY add-on.
Creating the Countertop and Moulding Details
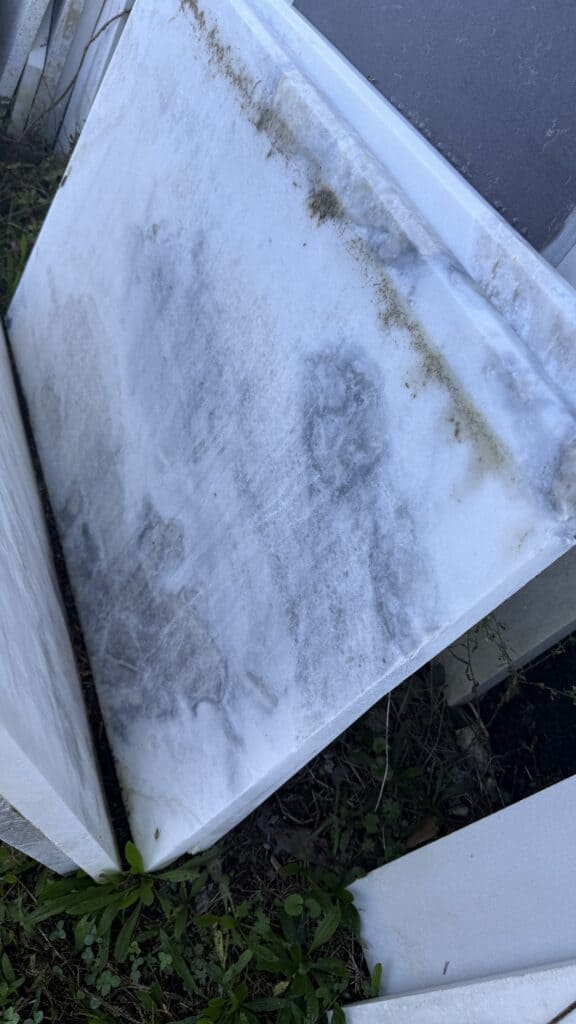
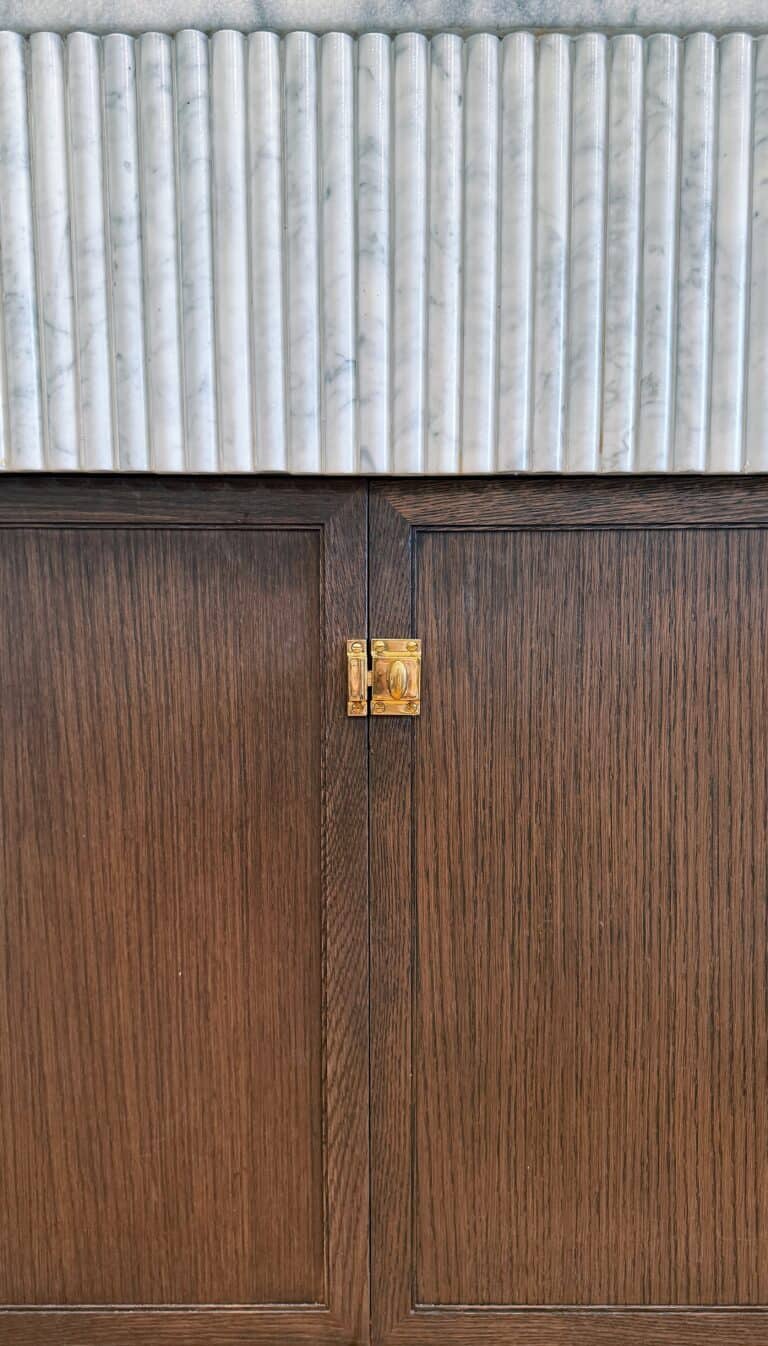
The counter is a marble remnant I found on Facebook Marketplace. I had the marble cut to fit the bar, and it instantly made the whole nook feel more polished and high-end. If you want marble or another high-end stone without the price tag- search FB Marketplace!
Using a marble remnant was such a good choice for a small built-in bar cabinet like this. Since the counter area was not huge, I did not need a full slab, but I still got the look and feel of real stone. The marble gave the beverage bar that traditional bar feeling I wanted, especially once it was paired with the mirror backsplash, brass details, and bistro shelves.
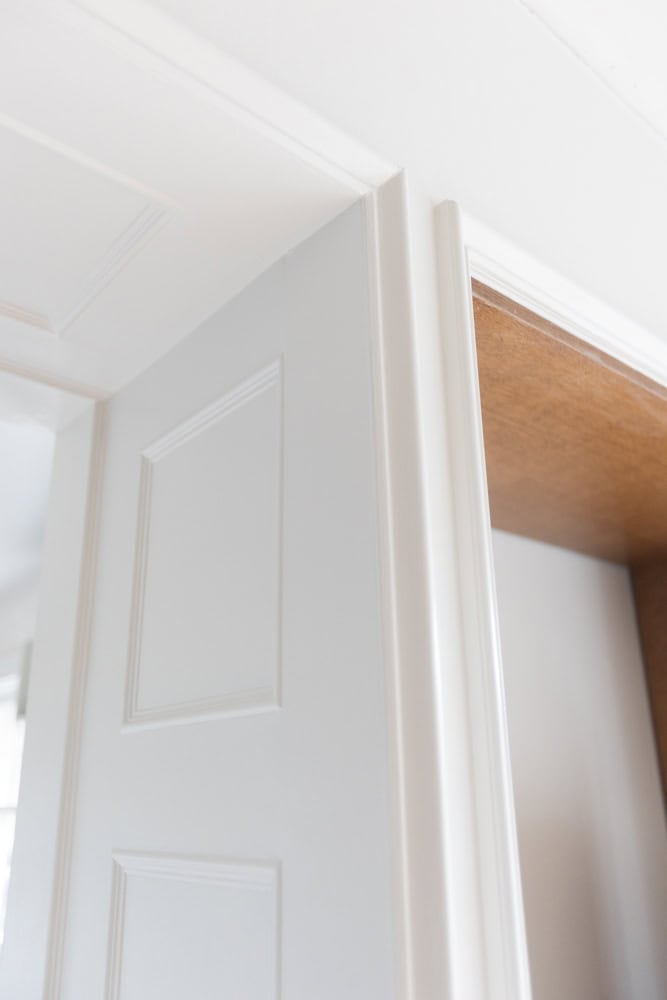
I noticed there was a lot of moulding detail on the surrounding walls in my inspiration photo and I knew that was a detail I could implement with little effort a low cost. I installed moulding around the surround and then also used a smaller size of the same profile to make a picture frame type inset moulding on the outer wall and walkthrough that was created when I built out this wall. I LOVE this detail.
The Brass Door Covers That Made the Cabinet Look Custom
One of the biggest design moments in this beverage bar is the cabinet front. Since I used an IKEA base cabinet, I knew I needed the doors to feel more special if the whole built-in was going to have that custom-looking bar cabinet feel.
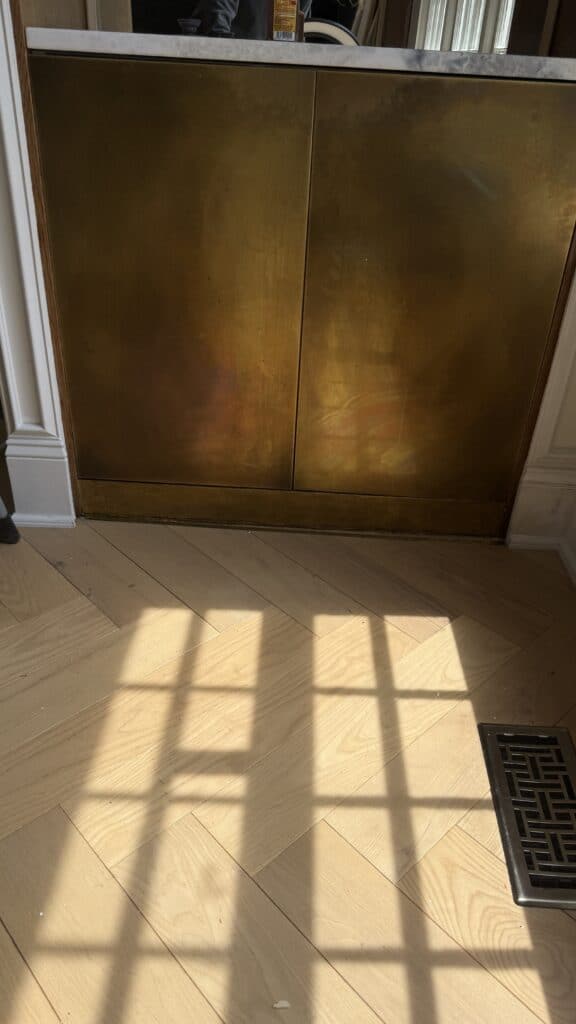
Instead of ordering fully custom cabinet doors, I started with inexpensive doors that fit the IKEA cabinet. Then I ordered custom solid brass door covers that were made to fit over those doors. Once the covers were installed, the cabinet looked like it had solid brass doors when closed, but the structure underneath was still the more affordable IKEA setup. These door covers alone are what I think allowed me to get pretty close to my inspo pic.
I also loved how the brass tied into the other finishes in the space. The antiqued brass bistro shelves, the warm wood stain, and the brass cabinet fronts all worked together to give the beverage bar a layered look. It feels polished, but not too perfect or brand-new.
The brass door covers were definitely one of the details that made the biggest visual difference. They let me get the look of a high-end built-in bar cabinet while still using a more budget-friendly cabinet base underneath. It is one of my favorite examples of mixing affordable pieces with one statement finish to get a custom-looking result.
How I Made the Baseboard Look Like Brass
After the brass cabinet fronts were in place, I knew the baseboard needed to feel just as intentional. A standard painted baseboard would have been fine, but it also would have broken up the look I was trying to create. Since the cabinet doors had such a strong brass moment, I wanted the bottom of the built-in bar to tie into that same finish.
Instead of using a full brass baseboard (because the size needed was SO expensive), I decided to create a faux brass finish. I used a combination of gold foil, gold paint, and black paint to build up a finish that looked aged and dimensional instead of flat and shiny. The goal was not for it to look like bright gold paint. I wanted it to feel more like brass — warm, layered, and a little imperfect.
This was one of those small DIY details that made the whole beverage bar feel more custom. The faux brass baseboard helped ground the cabinet and made the lower part of the bar feel connected to the brass door covers above it. It also added another layer of warmth against the Benjamin Moore China White paint and the Early American stained wood surround.
To make the bottom edge feel cleaner and more finished, I added a thin piece of real brass along the very bottom where the baseboard meets the floor. That little strip gave the faux finish a crisp edge and helped it sit more neatly against the floor. It was a small detail, but it made the entire base look more polished.
Adding a Mirror Backsplash to Reflect Light and Add Glamour
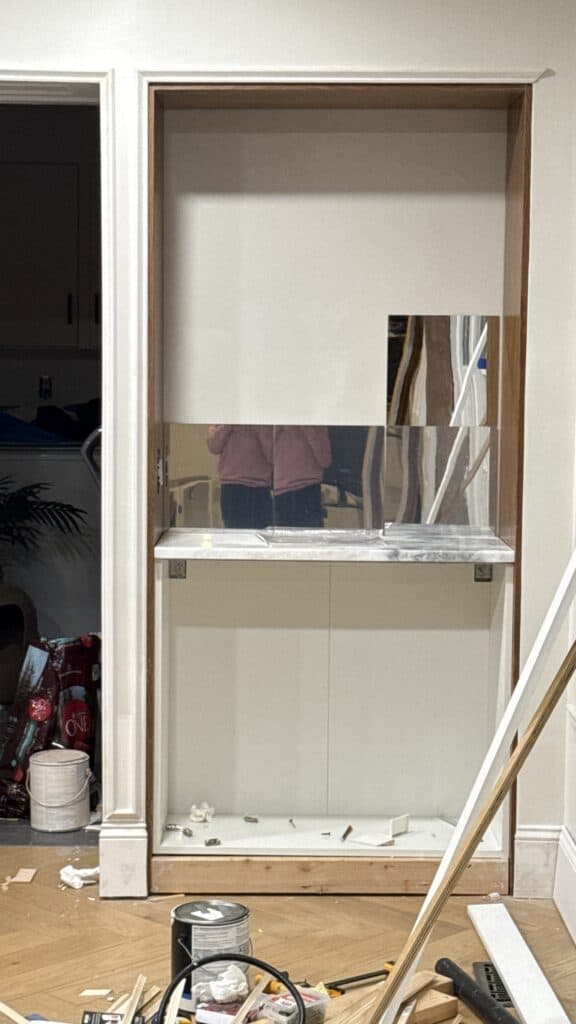
Once the cabinet, wood surround, and marble counter were in place, I started working on the details that would make the beverage bar feel more like a traditional built-in bar and less like a cabinet tucked into a wall. One of the biggest pieces of that was the mirror backsplash.
I found a piece of mirror on Facebook Marketplace and cut it to fit the back of the bar nook. The mirror instantly changed the feeling of the space. It added depth, reflected light, and gave the beverage bar that classic bar look I was hoping for. Since the nook is not huge, the mirror also helped it feel brighter and more layered instead of closed in.
I added ornamental moulding from Lowe’s to give the back of the nook (and to cover small gaps around the mirror) more detail. I stained the moulding to coordinate with the white oak surround so the whole space felt connected. This was one of those smaller details that made a surprisingly big difference. The trim helped frame the mirror and made the entire beverage bar feel more custom and finished.
I also used a wood outlet cover and stained it to blend in with the moulding and wood surround. Since the outlet was now inside the bar area, I wanted it to feel intentional instead of distracting. I chose an outlet that also has a charger built in, which made the beverage bar even more functional for everyday use.
The combination of the mirror, stained moulding, and wood outlet cover helped the back of the nook feel finished instead of flat. It gave the beverage bar more of that old-school bar feeling, but in a way that still worked for our kitchen and the way we actually use the space every day.
Adding the Iron Abode Riviera Bistro Shelves
The bistro shelves were the detail that finally made this beverage bar feel like a real bar. Up until this point, the nook had the structure, the cabinet, the marble counter, the mirror backsplash, and the brass details, but it still needed something above the counter to make the whole space feel finished.
Iron Abode gifted me the Riviera bistro shelves for this project, and I chose the antiqued brass finish so they would tie in with the brass cabinet fronts, the faux brass baseboard, and the warmer details throughout the nook. Since I was trying to create the feeling of a traditional bar, bistro shelves made so much more sense than standard wood shelves or upper cabinets.
I want to be clear… I did a LOT of research when looking for bistro shelves. I even considered trying to make them myself and here’s what I learned:
- DIY was totally out of the question. You know your girl is crafty and resourceful but I am not a welder and my one attempt at cutting basic glass for another project was a nightmare so custom sized shelves were not going to happen.
- There are almost no other companies or options for bistro shelves and the few that are out there are insanely expensive.
Iron Abode has a lot of styles, so many that it took me forever to decide which I loved MOST, but not so many that it is overwhelming. They also allow you to customize each style’s size and configuration, including if the shelves are mounted from the ceiling, the wall, or from both the top and bottom. Their Instagram has a lot of very good real-life installation examples of the styles that help you make your decision on which style is best for your project.
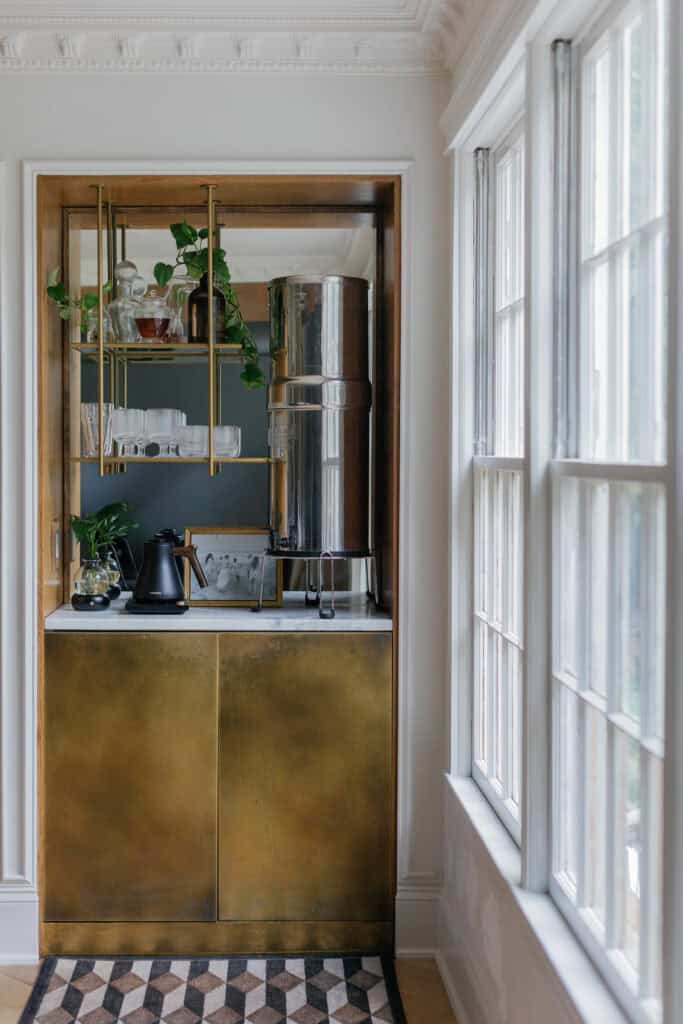
I hung the shelves from the top of the enclosure, which helped them feel built into the bar instead of added on after the fact. The glass shelves keep the nook feeling open and light, while the brass frame adds that polished, collected look I wanted. They give the beverage bar storage and display space, but they also act like a design feature on their own.
Installation was really easy, the only hard part is really having to hold them up while you install since your arms get tired and things need to stay straight. Grab a helper or two!
Functionally, the shelves are perfect for glassware and smaller pretty pieces. Visually, they completely changed the space. The mirror behind them reflects the glass and brass, the marble below gives everything a more classic bar feeling, and the antiqued brass finish helps the entire nook feel layered and intentional.
This is also where the beverage bar really started to feel custom. The shelves gave me a place to style our everyday glasses, a decanter, thrifted pieces, plants, and other pretty drink-related items without making the counter feel cluttered. They made the whole nook feel useful, but still special.
How I Styled the Beverage Bar Shelves
Once the Riviera bistro shelves were installed, I finally got to style the beverage bar like the traditional bar-inspired space I had pictured from the beginning. I wanted the shelves to feel pretty and collected, but not overly staged. Since this is in our kitchen and not a formal dining room or butler’s pantry, the goal was to mix beautiful pieces with things we actually use.
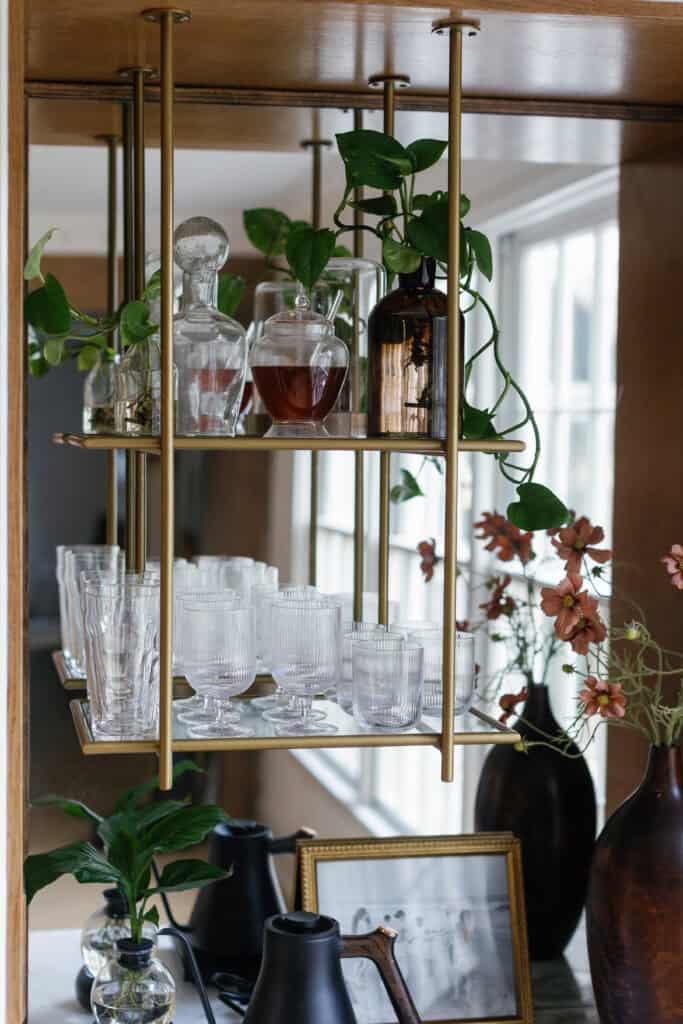
I started with glassware because that felt like the most natural fit for a beverage bar. The bistro shelves are perfect for displaying glasses because the glass shelves keep everything light and open, while the antiqued brass frame makes even simple everyday pieces feel more special. I used fluted glasses from Crate & Barrel and a decanter from West Elm to give the shelves that classic bar feeling. I had been needing to buy new glassware for ages so it was so exciting to finally do it. The options I chose were SUCH a good price and they are part of Crate and Barrel’s regular line so if/when my family breaks some I can just re-order.
Then I added a few more collected pieces so the shelves would not feel too one-note. I styled in some thrifted vases, a gorgeous honey pot from Tea Bloom (if you like tea this is THE site for high-quality but affordable tea-ware and loose leaf & bagged tea), and my sprout grower from Forages (if you have bougie aesthetics but also like to eat healthy then this is a Christmas wishlist must). I love adding pieces like this because they make the beverage bar feel personal instead of looking like everything came from one store on the same day.
Plants also helped soften all the brass, mirror, marble, and glass. I added propagated pothos to the shelves, which brought in a little bit of life and kept the whole nook from feeling too formal. The greenery is such a simple detail, but it makes the beverage bar feel more relaxed and lived-in.
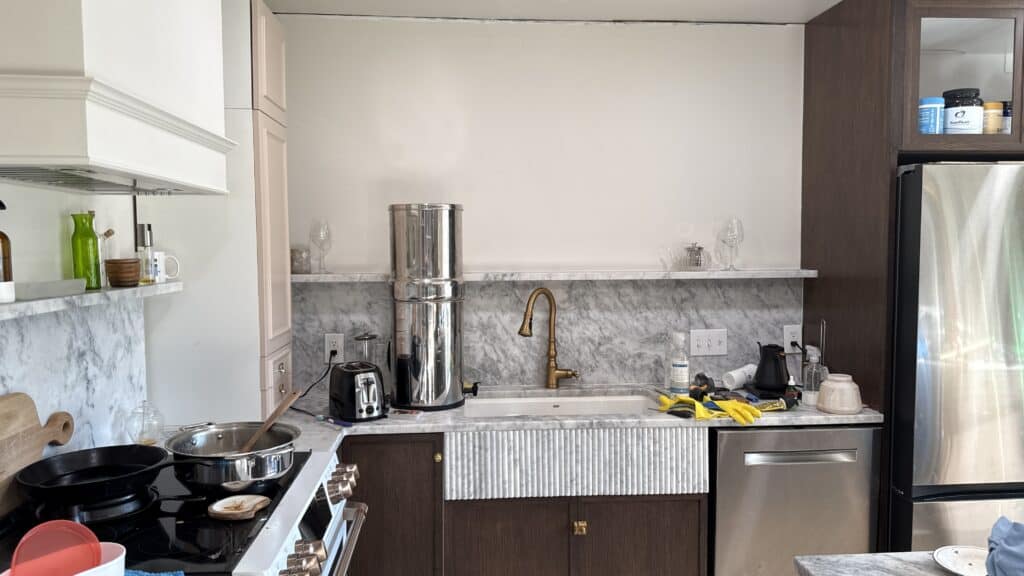
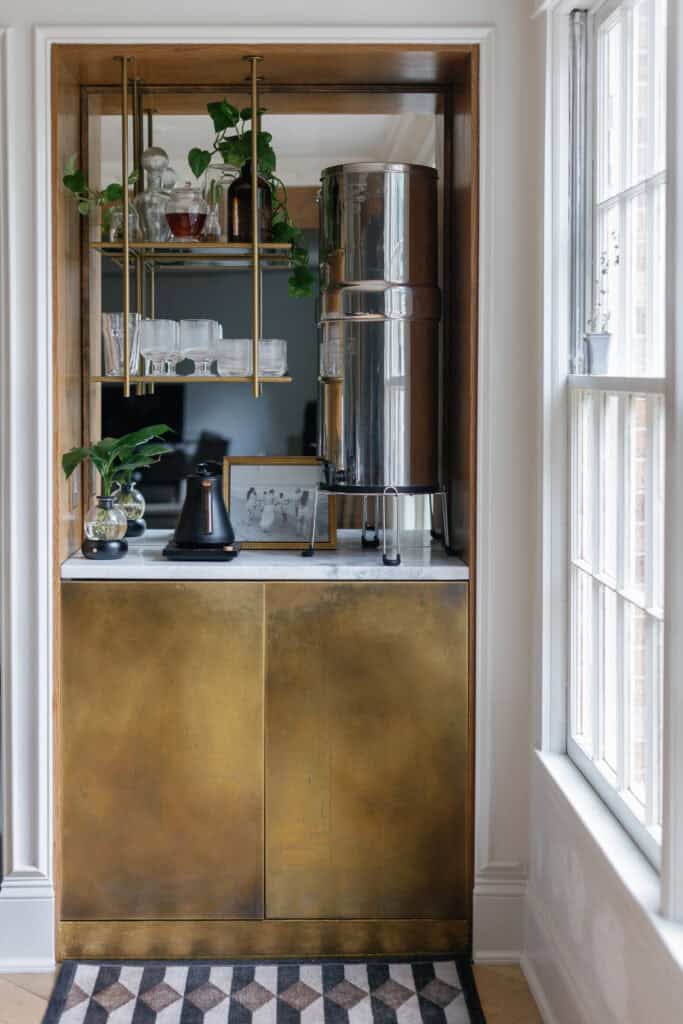
On the counter, I kept the styling more functional. Our mirrored silver Berkey water filter is the main reason this whole built-in beverage bar exists, so it has the place of honor on the counter. I also keep my black gooseneck kettle there because we use it all the time and it has a clean, modern shape that works with the rest of the design.
I also added a propagated plant from Lowe’s that has a little LED illumination when you press a button. It is one of those small, unexpected details that makes the space feel cozy, especially at night. Between the mirror, the brass, the glassware, and the little bit of light, the whole beverage bar has such a pretty glow.
Lastly, I used a 2×3 geometric Ruggable rug at the base of the beverage bar area. I wanted a rug to protect the wood floors from the occasional spill and also to add one last decor element to the look. I am a huge fan of Ruggable rugs. I have had AMAZING experiences with their customer service and the quality is superb.
The key for styling this space was keeping it balanced. I wanted it to look like a styled bar, but I did not want it to become cluttered or impractical. The shelves hold the pretty pieces, the counter holds the things we use every day, and the drawers below hide the extra glasses, mugs, tea, and beverage powders. It is decorative, but it still works hard for our family.
What We Keep in Our Beverage Bar Cabinet
As pretty as this built-in beverage bar is, the whole point of the project was to make our kitchen function better. I wanted this space to look custom and styled, but I also needed it to solve a very real storage problem. The Berkey water filter needed a home, and all the little drink-related things we use every day needed somewhere to go.
Inside the cabinet, we have two drawers that do the less glamorous but very necessary work. One drawer holds extra glasses and mugs, so they are close to the water filter and kettle. The other drawer holds tea, beverage powders, and the other drink items that would otherwise end up scattered in random kitchen cabinets.
Having everything gathered in one beverage station has made the kitchen feel so much more organized. Instead of walking across the kitchen for mugs, glasses, tea, or hot water, this little bar nook keeps all of those things together. It works almost like a mini kitchen beverage station inside the larger kitchen.
I also love that the practical pieces are balanced with the pretty ones. The drawers hide the extras, the counter holds the things we use every day, and the bistro shelves above give me a place to display glassware, plants, and collected pieces. It feels styled, but it is not just decorative. It actually works hard for our family every day.
Tips for Creating a Custom-Looking Beverage Bar at Home
If you want to create a custom-looking beverage bar in your own kitchen, my biggest advice is to start with function first. It is easy to begin with the pretty details, but the reason this built-in bar works so well is because it solved an actual problem for us. We needed a place for our Berkey water filter, glasses, mugs, tea, beverage powders, and kettle. Once I knew what the space needed to hold, the design decisions became much easier.
The second thing that made a big difference was using dead space. This started as a blank kitchen wall that was not doing anything useful. By building the bar into that spot, the whole area suddenly had a purpose. A beverage bar does not have to be huge to be useful. Even a small built-in bar nook can make a kitchen feel more organized and more custom.
I also think it helps to mix affordable pieces with a few high-impact details. For this project, I used an IKEA cabinet, a secondhand marble remnant, and a mirror I found on Facebook Marketplace. Then I added more special details, like the stained white oak surround, brass cabinet fronts, faux brass baseboard, and Iron Abode bistro shelves. That mix is what helped the beverage bar feel elevated without every single piece being custom from the start.
Repeating finishes is another way to make a DIY beverage bar feel more intentional. In this space, the brass cabinet doors connect to the antiqued brass bistro shelves and the brass-looking baseboard. The stained wood surround ties into the ornamental moulding and outlet cover. The mirror, marble, glassware, and silver water filter all play together instead of feeling random. When finishes repeat, the whole space feels designed.
For a traditional bar-inspired look, I would definitely consider adding mirror, marble, glass, and brass. Those materials instantly make a beverage bar feel more classic and collected. The mirror backsplash added depth, the marble counter made the water filter feel intentional, the glass shelves kept the nook feeling open, and the brass details added warmth.
Finally, think about what should be displayed and what should be hidden. The bistro shelves are perfect for pretty glassware, plants, a decanter, and collected pieces. The counter holds the things we use every day, like the water filter and kettle. The drawers hide the extra mugs, glasses, tea, and beverage powders. That balance is what keeps the beverage bar useful without making it feel cluttered.
A custom-looking beverage bar does not have to start with a custom cabinet order or a huge renovation. Sometimes it starts with one awkward wall, one very large water filter, and the decision to make something practical look a whole lot prettier.
Final Thoughts on Our DIY Beverage Bar
What started as a blank, unused kitchen wall became one of my favorite custom-looking moments in our home. The whole project began because we needed a better place for our Berkey water filter, but it turned into so much more than a practical storage solution.
I love that this built-in beverage bar works for real life. It holds the water filter we use every day, gives us a place for the kettle, keeps extra glasses and mugs nearby, and stores tea and beverage powders right where we need them. It made our kitchen more functional, but it also made that once-empty wall feel intentional and beautiful.
The finishes are what make the space feel special. The marble remnant, mirror backsplash, brass cabinet fronts, faux brass baseboard, stained wood surround, and Iron Abode bistro shelves all work together to create that traditional bar-inspired look I wanted. It feels collected and high-end, but it was built from a mix of DIY work, affordable pieces, secondhand finds, and a few standout details.
The Riviera bistro shelves from Iron Abode were truly the finishing touch. They gave the beverage bar height, display space, and that polished bar feeling that simple shelves would not have created in the same way. They also gave me a place to display glassware, plants, and pretty everyday pieces while keeping the counter useful.
This project reminded me that sometimes the best spaces come from solving a very specific problem. I did not set out to add a fancy built-in bar to our kitchen. I just needed somewhere for a giant water filter to live. But by treating that awkward wall like an opportunity instead of dead space, it became a beverage bar that looks custom, functions every day, and makes the whole kitchen feel more finished.
Frequently Asked Questions About Our Built-In Beverage Bar
This helps you naturally target more keywords without making the main post feel stuffed. It also catches Pinterest/Google searches from people wondering how to make a beverage bar work in their own kitchen.
Suggested FAQs:
What is a beverage bar?
A beverage bar is a dedicated area for drinks, glassware, mugs, coffee, tea, water, or other everyday beverage items. In our kitchen, it functions as a water filter station, tea station, glassware storage area, and pretty built-in bar nook.
Can you add a beverage bar to a small kitchen?
Yes. A beverage bar does not have to be large. Ours started as a blank wall, and the goal was to make use of dead space instead of adding a huge new cabinet area.
What do you put in a kitchen beverage bar?
We keep our Berkey water filter, kettle, glassware, mugs, tea, beverage powders, decanter, honey pot, plants, and a few decorative pieces in ours. I think a lot of people include a mini fridge and have sodas and sparkling waters. You could also use it as a coffee bar and of course, the original inspiration is to store and mix alcoholic beverages.
Are bistro shelves practical in a kitchen?
For us, yes. The bistro shelves give us a place to display glasses and pretty everyday pieces while keeping the counter from feeling cluttered.
How do you make a DIY beverage bar look custom?
Built-in framing, repeated finishes, real stone, mirror, moulding, brass details, and good styling all help a DIY beverage bar look more custom and intentional.
Sources and Shop the Beverage Bar
This built-in beverage bar is a mix of DIY materials, secondhand finds, custom pieces, and a few favorite styling details. I linked the exact sources I could below, along with similar options for the vintage, thrifted, secondhand, or custom items.
Main Bar Details
- Iron Abode Riviera Bistro Shelves in Antiqued Brass
- IKEA base cabinet
- Cabinet doors for IKEA cabinet
- Custom brass door covers
- Benjamin Moore China White paint
- Early American wood stain
- White oak for cabinet surround
- Lowe’s ornamental moulding
- Wood outlet cover
- Outlet with built-in charger
Counter, Backsplash, and Trim
- Marble remnant from Facebook Marketplace
- Mirror from Facebook Marketplace
- Thin brass strip for baseboard
- Gold foil
- Gold paint
- Black paint
Beverage Bar Styling
- Berkey water filter
- Black gooseneck kettle
- West Elm decanter
- Crate & Barrel glasses
- Tea Bloom honey pot
- Forages sprout grower
- Thrifted vases
- Propagated pothos plants
- Lowe’s LED plant
- Ruggable black and gold geometric rug